 10. Build a Table
TO PRINT THESE INSTRUCTIONS, RIGHT-CLICK IN THIS BOX AND SELECT 'Print'
To insert a table:
- Click on the Table Wizard icon

You will see this prompt box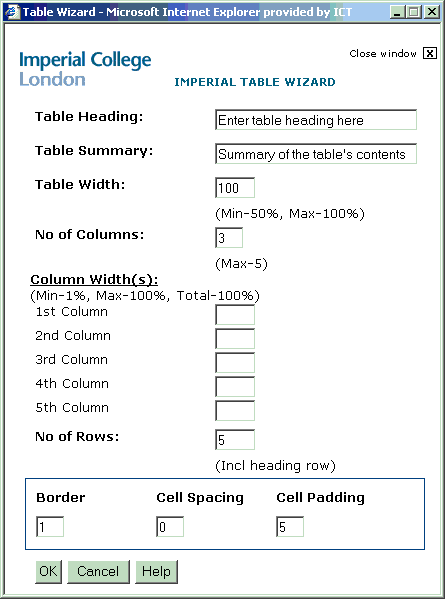
- Enter your required options:
Table Heading: This is the caption which will be shown above the table. It is optional, so you can clear this entry.
Table Summary: This is required to satisfy accessibility requirements. Enter a description of the table e.g. 'All members of the ICT Web Team and their roles'. This summary is not displayed by ordinary browsers, but some specialised browsers e.g. speaking browsers, will use it.
Table Width: The percentage of the available page width the table should occupy (Min-50%, Max-100%) You can leave this unchanged.
No of Columns: The number of columns you want in the table (Max-5)
Column Width(s): The percentage of the table width to be used by each column. Must total 100. (Min-1%, Max-100%, Total-100%)
No of Rows: The number of rows you need in the table, including the column heading row.
It is important to get this right when the table is first created as the table wizard does not allow you to add or remove rows.
Border: The width of the border around the table. If you enter 0 (zero) there will be no border. You can leave this unchanged.
Cell Spacing: The width (in pixels) of the space between cells of the table. You can leave this unchanged.
Cell Padding: The width (in pixels) of the space between the sides of a cell and the text within it. You can leave this unchanged.
To edit a table, click into each cell and type or paste the required text. You can use the arrow keys to move between cells, but the 'Tab' key will not work.
If you need to add or remove rows in an existing table, contact the ICT Service Desk for help.