The Trial Master File vs The Sponsor Trial Master File
A key document in the safe, efficient, and compliant running of a project, the Trial Master File (TMF) is an essential record of study documents that should begin to be compiled from the outset of the project. The TMF is usually in two parts: The Sponsor TMF, held by the Sponsor organisation, and the Investigator TMF.
It should be kept securely and easily accessible. It should also be noted that the Sponsor TMF should only contain documentation pertinent to the Sponsor.
Unlike the ISF or Investigator TMF, the Sponsor TMF will not contain identifiable information about participants. The TMF enables both staff and personnel, and the Sponsor, external monitors and other investigators to accurately assess the compliance and running of the project, and the quality of the data being produced.
In instances where the Lead Investigator / Chief Investigator is employed by the Institution acting as Sponsor (e.g. in the case of a University), the Sponsor may delegate the entire TMF to the Investigator. To avoid duplication, in these circumstances, all documentation will be condensed into a single TMF and will not be split across two.
Where the Sponsor chooses to delegate some responsibilities to a Contract Research Organisation (CRO), there will usually be a third TMF held by the CRO. The contents may vary depending on what responsibilities have been delegated, but the arrangements will be agreed at the very start of the project, when the Research Agreements / Contracts are drawn up; including details of which documents will be held in which TMF.
When commencing a trial, the Sites or locations where the various TMFs will be held should be identified and formally recorded. This is usually the responsibility of the Sponsor in partnership with the Lead Investigator.
The Trial Master File

What is a TMF for?
The TMF service two main points, directly relating to Article 47 of EU Directive 2005/28/EC, and the Regulation of the same: "All clinical trial information should be recorded, handled, and stored in a way that allows its accurate reporting, interpretation, and verification." "Systems with procedures that assure the quality of every aspect of the trial should be implemented. Aspects of the trial that are essential to ensure human subject protection and reliability of trial results should be the focus of such systems."
Ultimately, the main purpose of the TMF should be to have a clear, legible record of the study processes, such that it would allow the accurate recreation of the project activities along with any changes, decisions and justifications made across the course of the project.
What should be included?
The European Medicines Agency’s GCP Inspectors Working Group created guidance on what to include in a TMF, how it should be managed, and how it should be archived. N.B. The guidance is the same for hard-copy TMFs, eTMFs, or hybrid versions using elements of both.
All TMFs should include a comprehensive inventory or index of the documents contained within, or otherwise where to locate the documents. Additionally, documentation within the TMF should be stored in chronological order, in the appropriate section, with the newest documents at the top.
The overall contents of a TMF can be risk proportionate. If a project is classified as “low intervention”, there may be differences in what documents are required to be stored.
It is, however, prudent to retain as much formal documentation as is practicable, and any justification for reducing documentation should be recorded in the TMF. Additionally, it should be noted that there may be study specific documents that need to be kept, that may not be present on any standardised TMF checklist e.g. the manual for a specific medication or novel investigational medical product.
The NIHR Guidance for TMFs gives the following information on how to create, store and manage a TMF:
- Essential Documents
- Contemporariness
- Storage and Access
- Quality
- Copying
- Archiving and Retention
TMF: Essential Documents
“Essential documents are those documents which individually and collectively permit evaluation of the conduct of a trial and the quality of the data produced.”
It should also be noted that the Investigator TMF and the Sponsor TMF will have different content due to the different responsibilities of each party. Content may also differ depending on the degree of risk involved in the study – A risk proportionate approach may reduce the amount of TMF content. The following list is a full list of recommended documents, note that not all of these items may apply to your project.

N.B. Any trial documents included in the TMF such as Protocols, CRFs / eCRFs, consent forms, information sheets, adverts, compensation plans, Statistical Analysis Plans etc. must be dated and versioned. The copies included in the TMF must be the same date and versions as those identified by the application that received a Favourable Opinion from the Research Ethics Committee. If documents are changed, you must check if you need to submit an amendment to the REC or other relevant regulatory authority.
Contemporariness
To have documentation added to the file in a timely manner, to allow the record to remain up to date and accurate. You should define the timelines and limits for the addition of new documents at the beginning of the project.
Storage & Access
The TMF must be kept securely for the duration of the project, in a place where it can be accessed by appropriate members of the trial team as well as personnel such as study monitors.
In practice, depending on where you are conducting your project (your Site/s), you will likely have access to a secure filing location. An example of this is at the Imperial College Research Facility (ICRF) at Hammersmith Hospital – They are a dedicated research facility with secure storage rooms for study materials and files. The area where project documents are stored is accessed via a corridor that requires badge pass access, and the room itself is locked with a numerical keypad. The combination is only provided to researchers whose projects have been accepted to the ICRF, and who have completed their Site Initiation Visit. Projects are assigned a section of shelving to store their files over the course of their work, but the space is shared with other teams so there is a level of inter-team trust required. Facility users are encouraged to report any unusual behaviour.
Other facilities may vary but will likely be reasonably similar to these practices.
Where your project is being conducted primarily from an office space, you will need to set up a secure storage area for your project documents (not just the TMF). This can be as simple as a locked cabinet where files and materials will be stored, to which only study personnel have the key/combination. If your office is shared with non-study personnel teams, you should make it clear to them that no one else is to attempt to access, move, or otherwise interfere with the storage without express permission and direct supervision from a senior member of the study team.
The TMF must be readily accessible at all times. Not only will you need to refer to it regularly, and update the documentation contained within, but it will need to be regularly inspected e.g. by your study monitor. When setting up your storage, ensure that it is accessible as well as secure.
Quality
“The clinical trial master file shall at all times contain the essential documents.”
Guidance recommends that the Investigator and senior team implement risk-based quality checks (QC) to ensure the TMF is of the highest quality across the project. The TMF should be regularly reviewed to make sure that:
- The TMF is up to date and new documents are added in a timely manner.
- All essential documents are available in the TMF and are appropriately filed.
- Documents are filed in appropriate locations, in a logical order.
- Documents are correctly indexed, and the index/contents pages are updated when new documents are added.
- Documents are accessible to team members according to roles/permissions. The TMF should not be accessible to team members who do not need to view it, or to external staff/non-team members.
- The TMF should be reviewed alongside any eTMFs to ensure they match and are consistent. These reviews should include the audit trail for the eTMF.
The Sponsor should also be undertaking regular audits of the Sponsor TMF, and they should be adhering to equivalent QC procedures for their own documentation.
Regarding Certified Copies of documents:
Either an electronic or hard copy of a document that has been certified, e.g. by a dated signature or other validated process, to be a true copy of the original document, containing all the same information, context structure and details.
At any point where an electronic copy will irreversibly replace the original hard copy document, e.g. where the original is destroyed, the electronic copy must be a certified copy.
Quality review (QC) procedures for certified copies should consider the following:
- That information contained in both the original and the copy are consistent with each other, and match.
- Where applicable, the accuracy of the meta data associated with the documents.
- Matching file names, including noting where a document is an updated version of an existing document.
- Image quality – Where reproducing images, you must ensure that copies are clearly legible with colours accurate to the original, particularly where ink colour gives context to signatures, annotations, or edits.
- The eTMF audit trail associated with the document and any copies.
- Approvals of the certification process, where applicable.
Not all copied documents will need to be certified, certification primarily applies to documents where the copy will override the original. Any and all practices relating to copying documents, including those for non-certified copies, should be outlined in the SOP and the beginning of the project.
Archiving & Retention
N.B. For Imperial projects you will likely be using the ACRU Service, Imperial’s in-house archiving service.
To begin, the Investigator should ensure that the TMF (and any other documents to be archived) are complete, and in good condition. It is prudent to complete a final audit to double check everything. The main tenet of archiving procedures is that the archived materials remain accessible, within reason, upon request.
Additionally, you should disclose as part of the archiving process, to whomever is responsible for maintaining the archives, the retention period for the materials. Commonly, trial documents should be retained for 10 years after the end of the trial, though this may be longer depending on the project specifics and any regulations or legislation that apply to the project. The retention period may also be longer if the project involved the use of an IMP that has since been commercialised, especially where the results of the project are used as evidence of effectiveness.
Access to archived documents should be appropriately restricted. This is usually the responsibility of the archiving service.
Things to check and consider when preparing to archive a project:
- Completeness of the documents and materials.
- The format of digital materials – Over the course of the retention period, digital materials may degrade or become obsolete. Consider making a digital transfer to a more appropriate format if needed.
- Fully index all items to be archived, including box numbers, so that items can be easily retrieved. Follow any specific instructions from the archiving service.
- Store items in appropriate containers for archiving – Follow any specific instructions from the archiving service.
The Investigator Site File

The Investigator Site File (ISF) is the primary file, kept on Site, that contains the bulk of information relating to the project, and important documents like medication manuals, technological manuals for equipment, and details and instructions on project processes and procedures. N.B. The ISF may contain participant identifying materials and should be kept in a secure but readily accessible location on Site.
The list below, curated by the NIHR ( https://www.nihr.ac.uk/suggested-investigator-site-file-contents ) is a basic introduction to everything you should be including, in the order you should be presenting it. You might find it useful to use section break pages with labelled tabs, to more easily find important items. Additionally note that some of these items may also be duplicated in the Trial Master File. For some items you may find it easier to have a surface level copy of a document (e.g. the letter confirming a Financial Agreement) in the ISF, while signposting to where the full documentation (e.g. the full Financial Agreements & Contracts and relevant communications) can be found in the TMF.

The Delegation Log

The Delegation Log is a vital record of the project or study team and designates the responsibilities and permissions to the team for the execution of the project.
The Log is usually a table with columns for the following categories:
- Team member name
- Job titles
- Responsibilities on the project e.g. administration, clinical visits, management etc.
- Permissions on the project e.g. access to samples, access to data, access to participant details and communications etc.
- Date the person joined the team
- Signature (to acknowledge acceptance of the delegation).
- Date the person left the team (to be completed as applicable).
- Witness signature (should always be a senior or qualified team member, usually that person’s manager).
The Delegation Log is a good example of a living document. It should be checked regularly for accuracy and should be updated promptly when there are any changes to the project team or their responsibilities.
In this context “Responsibilities” refers to the tasks that the relevant team member will be undertaking as their part in the project. For clinical team members this will likely mean undertaking, recording, and supervising participant appointments / visits, sample handling, and liaising with other team members. For project administration team members, this may mean completed recruitment procedures, communicating with participants and arranging appointments, sample handling, data validation and management, document and paper writing, and other tasks. Use your best judgement in defining the responsibilities of each team member – You don’t need to go into excessive detail, but an effort should be made to capture a full picture of each team members role on the project. It can be useful to add the phrase “and other X duties as applicable” as a catch all (e.g. for clinical staff it could be “and other clinical duties as applicable”, for administrative staff “and other administrative and project duties as applicable” or similar).
“Permissions” is an important category to include as it will denote the areas of the project that each team member is qualified and allowed to interact with. Much of the material handled by the team will be sensitive or confidential in nature, and much of the information you work with during the execution phase of a project (particularly the personal data relating to participants) will be subject to legislation such as the UK GDPR. It is crucial to the integrity of the project to ensure that data, samples, and even relationships with, and safety of, participants and other team members are handled with the utmost care. As such, you should place some limitations on which team members have access to components of the study.
For example, your Chief / Principal Investigator (CI / PI) will often not be involved in the day-to-day running of the study, as such they don’t need to see participant’s personal data except in very specific circumstances, so you would not include access to participant personal data in their permissions. They would, however, need access to the anonymised data generated by the study, and anonymised records such as AE/SAE/PD Reports, so this should be stated in the “Permissions” field of the Delegation Log.
On the other hand, your Project Administrator / Officer will need access to participant’s personal data to be able to arrange appointments, and they may need access to samples and data generated by the study to complete data validation tasks, so these should be noted in their “Permissions” field, but your Project Administrator generally wouldn’t need access to participant’s medical records, so this should not be included. In short, the “Permissions” field should only contain the items that that team member will need access to / will be working with, and you should omit any other items.
Think carefully about the responsibilities of each team member and use your best judgement to decide on their permissions. It is valuable to consult with the team in a group setting to decide these items, where possible, and take guidance from your senior team members such as your CI / PI.
Safety Reporting
Recording Adverse Events
Note: This is covered in full in our "How to Write a Study Protocol" resource here. Please check that resource for the full information on safety reporting in clinical studies, including incident definitions.
Your SOP will briefly outline expectations for how the administrative team will record any adverse events (serious or otherwise), protocol deviations, device deficiencies etc.
You will need to keep a record of any and all incidents that fall under the incident definitions, which should be categorised in a logical and practical manner, additionally classed as "serious" and "non-serious" (or similar), and you should organise regular (ideally monthly at minimum, but may depend on how may participants you see in a month), meetings that include your CI / PI to discuss any new incidents.
Your CI / PI will then be able to assess how the incidents were responded to, if they have been categorised and defined correctly, if any further reporting needs to occur, and will sign-off on them if they are happy with the procedures to date. When recording incidents involving participants it is vital to note the anonymised participant ID of the the participant involved, not their actual name. REMEMBER: Serious Adverse Events must be reported to the CI / PI immediately.
Incident categories can be devised organically as the project progresses, but some categories to consider could include:
- Appointment scheduling issue
- Trial supplies
- Participant medical event
- Side effects
- Participant compliance
Take a look at the example template available in the PDF copy of this resource to see how an Adverse Event Log can look, and how the categories system works.
Beginning your project with a strong incident reporting system can help you monitor and track any problems and can better protect the safety of your participants by allowing you to spot any patterns or recurring issues.
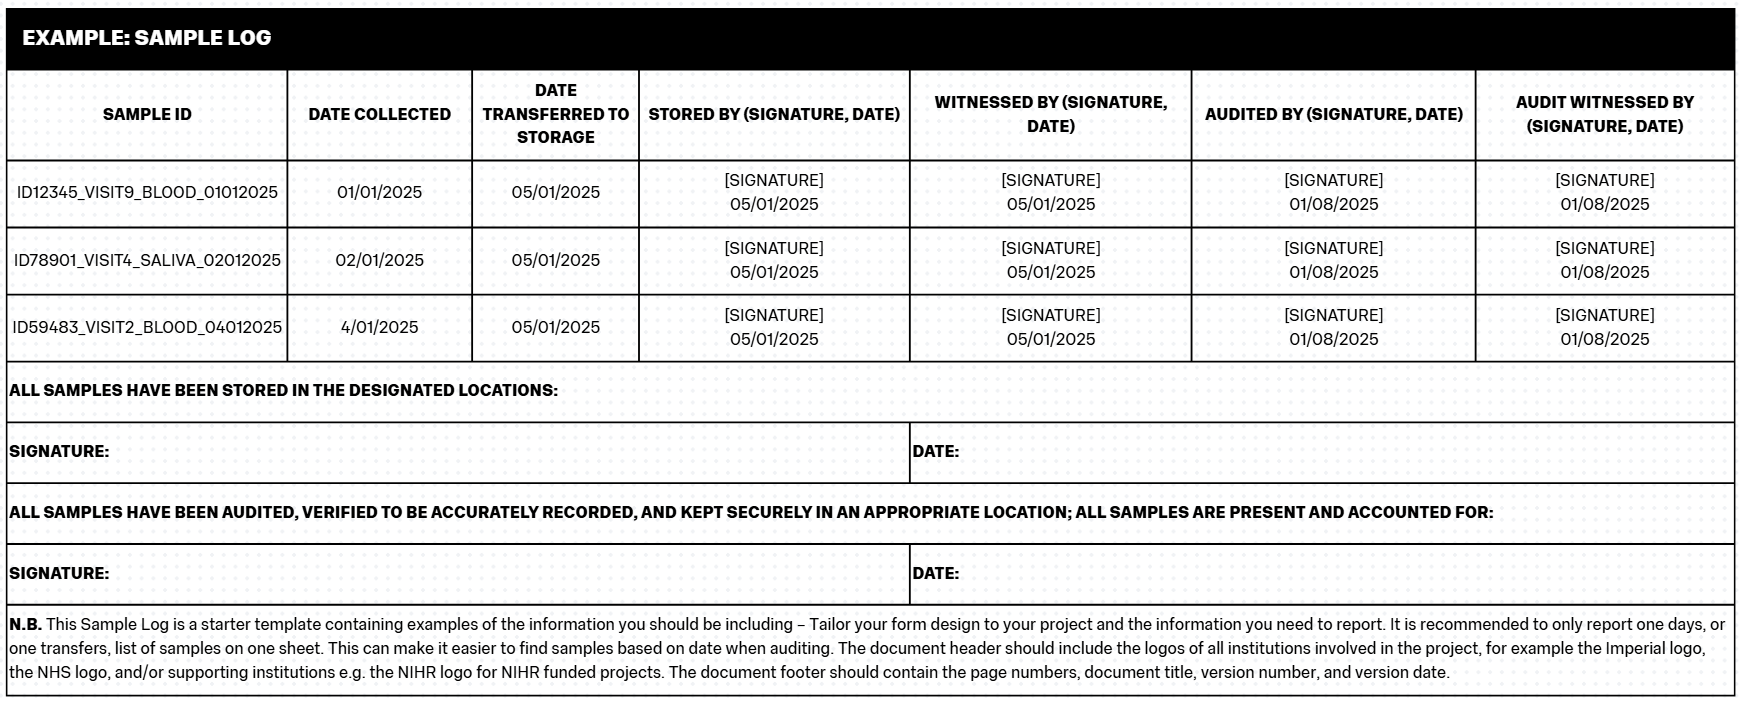
The Sample Log
The Sample Log is the document that records the full list of all samples collected on the project. It contains the main information about the sample including Sample ID (see below), date collected, date transferred/stored, and information on who completed those practices. Participants should be fully anonymised on the Sample Log, you should only ever use their Participant ID on the Sample Log.
You must record your samples, ideally at the time of collection (and then signing across processes such as transfers) to maintain something akin to a “chain of custody”. This process is important because it defines responsibility for the samples at different stages of the project and reduces the chance of samples being lost.
The Sample Log should be treated in a similar fashion to CRFs/eCRFs. The Log should be completed neatly, in black pen and block capitals, and should be filled in consistently by all team members (e.g. using the same date formats, the same Participant ID formats etc). When completing the Sample Log, if you make a mistake, you should use a single strikethrough to delineate the mistake, and then write the correction nearby. You should also sign and date any such edits. Any samples that need to be destroyed (outside of scheduled destruction at the end of a project / retention period), should be annotated as such on the Log as well as being documented in a File Note.
Sample Logs should be kept in the Trial Master File / Investigator Site File.
It can be useful to additionally record Sample IDs (see below) and information such as date collected and which practitioner collected the sample, in the Participant File they relate to, in case you need to cross-reference the Sample Log later.
Creating Case Report Forms
Good data management is critical to producing scientifically valid and high-quality research. One of the foundations of data management in the context of clinical trials is keeping clear and detailed records of data gathered from participants. This is completed via Case Report Forms (CRFs), also known as Patient Data Forms.
A CRF should be drafted at the beginning of your project, as a template tailored specifically to your study, that captures all relevant information to be collected at each participant visit. This can include:
- Participant ID / number
- Date of visit
- Title of visit e.g. (Visit 1 – Screening / Visit 2 – Baseline etc).
- Consent – Participants must be re-consented at the beginning of each visit. This can be a simple check to make sure they are comfortable continuing their participation but should be acknowledged and recorded on the CRF.
- Biometric data:
- Height
- Weight
- BMI (or similar such as Lean Mass / Fat Mass)
- Age
- Blood pressure
- Inclusion criteria
- Exclusion criteria
- Current medications
- New medications
- Existing medical history, or any changes to medical history
- Smoking status
- Site name / Site code (where there are multiple sites involved in the project)
- Protocol deviations
- Adverse Events / Serious Adverse Events – Annotate any actions taken including necessary or completed reporting.
- Visit details – include any appointment or visit specific details, observations carried out, compliance with any interventions, details of interventions administered.
- Visit specific measurements – Include any relevant blood test results, imaging results, and the results of any other testing, plus the dates when the tests occurred / results were received.
- Notes – It is prudent to leave room for any additional comments or notes that may not fit well elsewhere.
- Signature and date – The clinician or team member overseeing the visit must sign, print their name, and date each CRF.
Note that Participant ID / number, date of completion, and clinician / team member initials should feature on every page of the CRF (including the reverse side of hard copy sheets where printing is double-sided).
The CRF, as with all other trial documents, should have a footer detailing page numbers, the document title, version number, and version date.
Any tick box questions (e.g. Yes / No questions) should be designed consistently throughout the CRF. Do not switch the order of tick boxes around or vary it throughout the CRF as this will increase the likelihood of mistakes during completion and will unnecessarily complicate data extraction.
Each CRF should be completed during the visit and should be signed off and filed correctly at the end of the visit. You should keep copies of participant CRFs in both the participant’s individual file, and within the Site File. It is also prudent to keep secure digital copies, usually on multiple external hard drives (for back up purposes).
CRFs should be designed so that there is no room for discrepancies between forms, especially where there may be different team members completing the form. A good example of this is items like date fields – Instead of using an underscored line where the date should be written, you should use the appropriate number of square fields to show to format:
Image based on https://www.ncbi.nlm.nih.gov/pmc/articles/PMC4170533/
When completing a CRF, you must not leave any field blank, at minimum unknown values should be denoted as such and a file note for why those measures were not taken (where that constitutes a protocol deviation) should be completed. Repeated mistakes in recording participant data, or repeated failures to conduct or record measures, are classed as serious protocol deviations that can put both participant safety and the future of the trial in jeopardy. For example, in a study where participants must have blood test results within certain parameters before they can be prescribed the study medication, if the blood test results are not recorded or the measure is not taken and the medication is still prescribed to the participant, there could be life threatening outcomes.
Any errors in the completion of a CRF should be crossed out with a single line, with the edit written in a suitable location such as a nearby margin, initialled and dated by the clinician / team member making the change.
You should create a CRF completion guideline document to preface all CRFs, and to be read and signed off on as part of the Site Initiation Visit (to be completed by all staff undertaking CRF procedures). The guideline document should be always available for reference, and should include:
- Entries in the CRF should be written in black ink / black ballpoint pen.
- Write in all caps, ensuring that all entries are clear and legible.
- Do not overwrite or erase.
- Do not use correction materials such as white out or TipX.
- Where corrections are made, strike the incorrect entry with a single line, and annotate the correction in a nearby appropriate place such as a margin. Corrections must be annotated with the author’s initials / signature and the date of the correction.
- Acceptable abbreviations are as follows:
- UK: Unknown
- NA: Not applicable
- ND: Not done
- For items with binary answers (Yes / No questions), answer fields / boxes should be marked with an X.
Tailor your CRF completion guidance document to your specific CRF, be thorough, and make sure the guidance is clear and unambiguous to all team members. The guidance can either be treated as a front page for all CRFs, or can be situated on the reverse of all CRF pages so that it will be opposite the page to be completed at all times (allowing for easy reference).
CRFs should be validated at regular intervals to confirm accuracy – This will be covered in the later “Data Validation” section.
Further information about creating CRFs can be found at https://www.ncbi.nlm.nih.gov/pmc/articles/PMC4170533/
File Notes
File Notes are an additional method of recording and storing participant information. They are most commonly used to record protocol deviations (PDs) and other important happenings that occur outside the remit of the participant’s usual visit schedule.
Your File Note template should include:
- Participant ID / number
- Date file note recorded
- A concise title / reason for the file note including identifying numbers for events e.g. “PD001” or “AE001” etc.
- A good sized space to describe the file note / event
- Signature and date – The clinician or team member creating the file note must sign, print their name, and date each form.
Once completed, the original file note should be stored in the relevant participant file, and a copy should be stored in the Site File (and backed up onto at least one secure external hard drive).
You should also keep a categorical, numbered list of all events related to file notes stored in the Site File (and backed up onto at least one secure external hard drive). This list should include:
- Event ID number e.g. “PD001” or “AE001” etc.
- The Participant ID / number it relates to.
- The short sentence describing the event e.g. Visit 1 occurred 2 days outside of window; or similar.
File Notes and the record list of file notes must also be validated at regular intervals.
GP Letters
As part of caring for your participants across the duration of their time on your project, you should be keeping their primary caregivers informed of any changes to the participant’s health or health needs. The participant must consent to the sharing of this information, so you should include the information in the Information Sheet you provide to participants, and you should include it on the Consent Form for your project.
You can also check with participants which caregivers they would like to receive the information, for example their:
- General Practitioner (GP)
- Specialist Consultant - Particularly where the condition being studied / treated on the project has recruited from a specialist clinic, or where it is otherwise known that the participant is under the care of a specialist.
- Personal or Home caregiver
- A legal guardian responsible for medical care provision
As standard you should be informing their GP, and any specialist Consultants directly involved in the participant’s standard care.
Commonly called a “GP Letter” (regardless of the eventual recipient), this template should be a standardised letter form that allows you to input participant specific information quickly and easily. You should be able to include the:
- Participant name
- Participant date of birth
- Participant home address - N.B.You will need to unblind participant information for GP Letters, as the GP will not have access to databases for participant ID numbers. The GP Surgery or Clinic will need to be able to identify and direct the letter to the appropriate person upon receipt and the doctor will need to know which of their patients you are referring to.
- Project title
- Short summary of the intervention
- Short summary of any changes to the participant’s health
- Short summary of any clinical measures, including:
- Biometrics (height, weight, blood pressure)
- Blood test results
- Imaging results
- Biopsy results
- Short summary of any medication changes, side effects experienced, or suggested medication changes.
- Short summary of any Adverse Events / Serious Adverse Events experienced by the participant.
- Any relevant recommendations for referrals, further testing, or necessary monitoring.
- Any other relevant information or details.
You may also want to have another template that you send to primary caregivers when the participant joins the project, a short letter to inform the doctor of the participant starting an intervention, what that intervention is, and how it may affect them.
The purpose of these letters is to keep primary caregivers informed about the changing care and care needs of the participant. They can allow for improved monitoring, and can support participant safety.
Examples & Templates
- Example: Case Report Form
- Example: Delegation Log
- Example: File Note
- Example: GP Letter
- Example: Safety Reporting Sheet
- Example: Sample Log
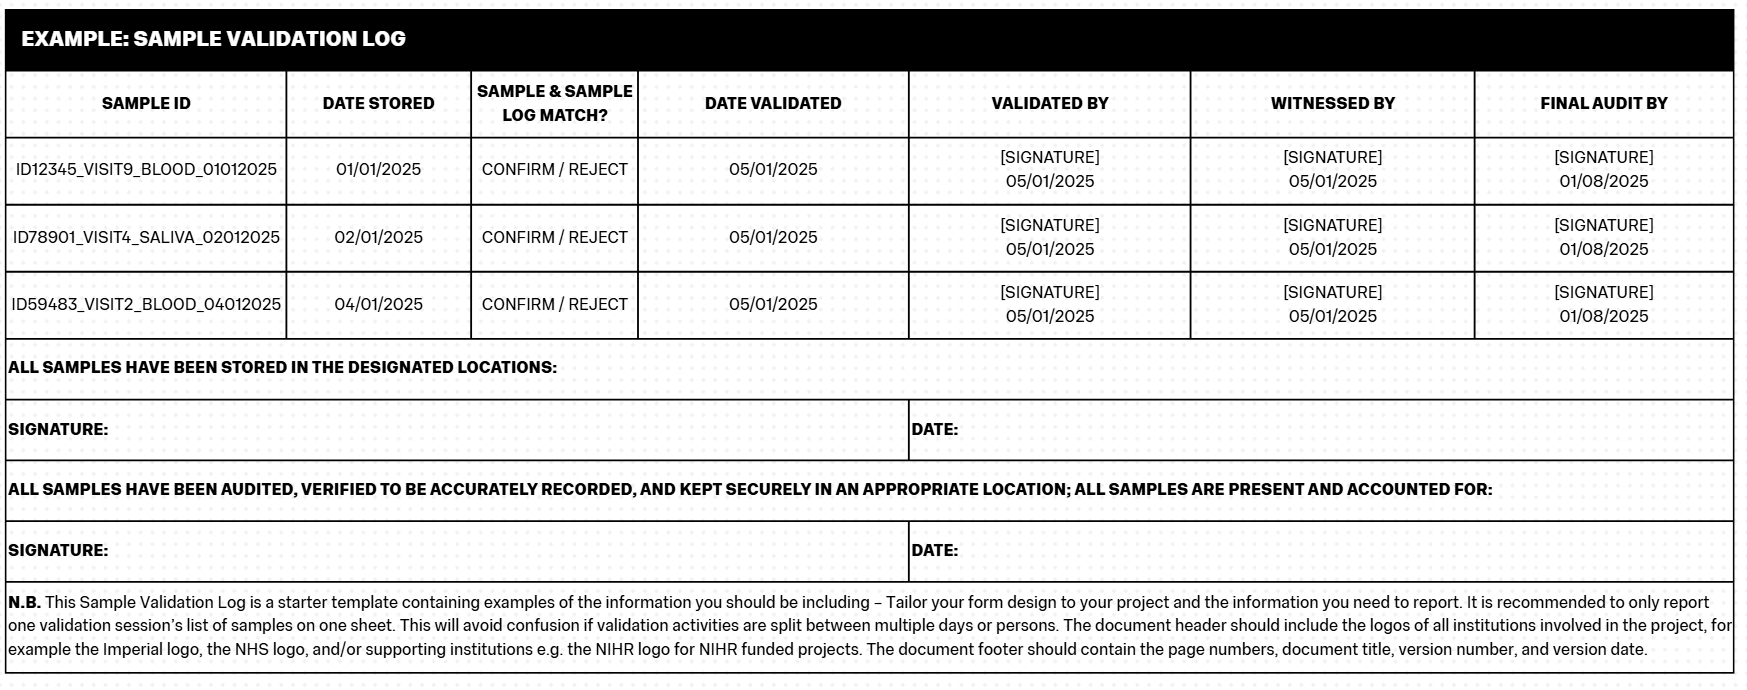
- Example: Sample Validation Log
N.B. This CRF is a starter template containing examples of the basic information you should be including in your CRFs – Tailor your form design to your project and the information you need to gather. When completing a CRF, remember the rules mentioned in the section above. Remember that you may need to anonymise CRFs using only participant ID numbers instead of names.
The document header should include the logos of all institutions involved in the project, for example the Imperial logo, the NHS logo, and/or supporting institutions e.g. the NIHR logo for NIHR funded projects. The document footer should contain the page numbers, document title, version number, and version date. The footer must include a space for the clinician conducting the visit’s signature/initials and the date. This must be present on every page.
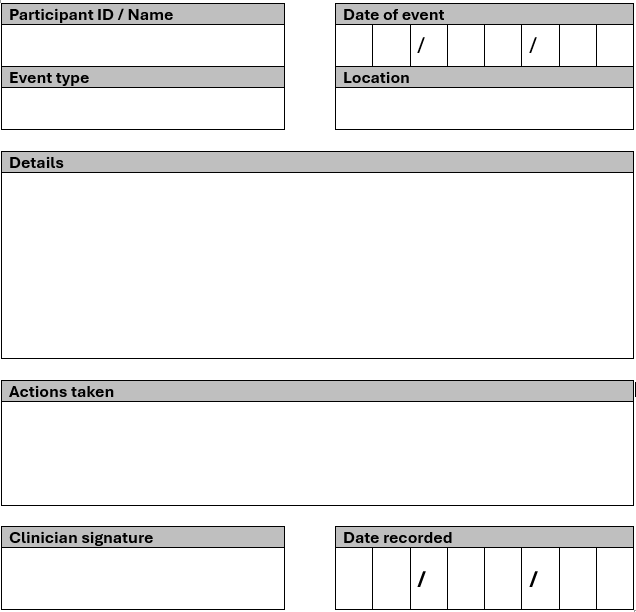
N.B. This File Note is a starter template containing examples of the basic information you should be including – Tailor your form design to your project and the information you need to report. When completing a File Note, remember the rules mentioned in the section above. Remember that you may need to anonymise File Notes using only participant ID numbers instead of names.
The document header should include the logos of all institutions involved in the project, for example the Imperial logo, the NHS logo, and/or supporting institutions e.g. the NIHR logo for NIHR funded projects. The document footer should contain the page numbers, document title, version number, and version date. The footer must include a space for the clinician conducting the visit’s signature/initials and the date. This must be present on every page.

N.B. This GP Letter is an example of the basic information you should be including – Tailor your letters to your project or the specific circumstances. When completing a letter, remember the rules mentioned in the section above. Use only the
participant’s name, do not disclose their randomised study ID number.
The document header should include the logos of all institutions involved in the project, for example the Imperial logo, the NHS logo, and/or supporting institutions e.g. the NIHR logo for NIHR funded projects. The document footer should contain the page numbers, document title, version number, and version date.

Download this Resource / Contact Us
You can download a copy of this resource here: How to write Study Documents - For Investigators (PDF)
If you would like to contact us, or if there is a resource you'd like to see, reach out to us using this form!