Operational strategy
During surgery the robot and its controlling computer are used in four stages:
Operational strategy
It is important that the length of the prostate is known and that the robot is positioned at the bladder neck. The measurement phase of operation allows the surgeon to move the robot under computer control along the prostate from the bladder neck to a landmark feature - the Verumontanum - to define the region in which cutting will take place. Cuts past the verumontanum may damage the sphincter muscles so these are to be avoided. The surgeon estimates the position in the prostate using visual cues - i.e. his skill in identifying features from a video image from within the prostate. The image below shows the screen the surgeon sees while measuring the prostate. In the top left is a real time camera image from within the prostate. To the right is a gauge indicating the position of the resectoscope tip, while underneath are a set of control buttons and simple instructions for the surgeon. The controls are activated by touching a light pen to the screen over the appropriate button.

Once the robot is positioned at the bladder neck and the prostate measured, an ultrasound probe is passed down the resectoscope and the robot set to acquire scans and retract in 5mm intervals. This builds up a three dimensional ultrasound image of the prostate. Once this image is in the computer the surgeon can use it to design the cavity to be cut.
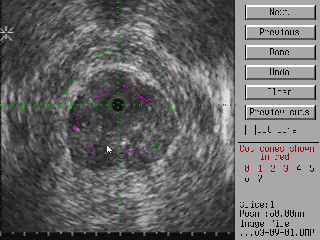
Having scanned the prostate, the surgeon can mark on each image the region he wishes to remove. The cutting volume is then presented to him as a three dimensional model that he can manipulate to optimise the cutting volume and time. The image below shows the screen the surgeon uses to outline the cutting volume overlaid onto each slice of the ultrasound image. Drawing the outline is simply a matter of sketching it onto the ultrasound image with the light pen.
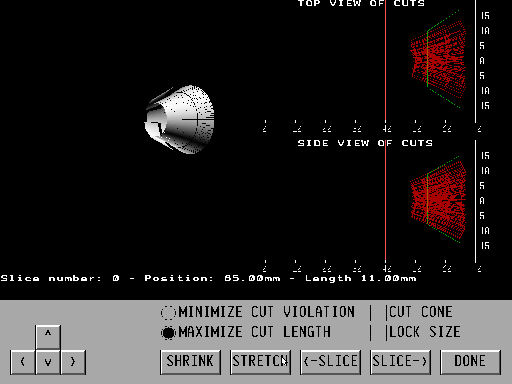
The display below is used by the surgeon to adjust the cutting cones. The computer starts by making each cone as long as possible, however the surgeon can fine-tune the cutting program by adjusting the cone lengths and turning on or off specific cones (the initial geometry specified by the surgeon may be such that some cones the computer generates more-or-less completely overlap other cones. A case in point is shown below. To save cutting time, the surgeon can shorten the right hand cone (marked green). Click here or on the image for a larger version.
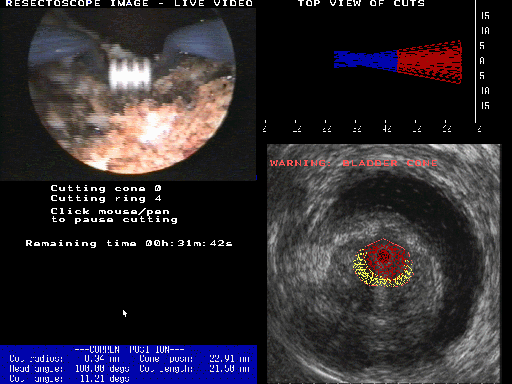
Finally, the robot is set to cut the prostate. Starting at the bladder neck and working backwards towards the verumontanum, each cone is cut as a sequence of concentric rings. When a cone is complete the robot retracts a little and cuts the next one. During the cutting procedure information is presented to the surgeon in three forms:
- a plan of each cut to be made, with an indication of when it has been taken, overlaid onto the ultrasound image appropriate for the location
- a side view in schematic form showing progress along the prostate
- a video image from within the prostate
This information can be seen in the image below. The real time image of the prostate is top-left, the schematic view showing a top-view of each cut is shown to the right, while each cut, overlaid on ultrasound is shown bottom right. A time indicator and position within the cutting program is also shown. In addition, since this is still at an early stage, engineering information is displayed at the bottom of the screen.
At any time the surgeon can stop the robot, adjust parameters such as cutting speed, and then continue. Alternatively, if a problem occurs he can end the procedure.
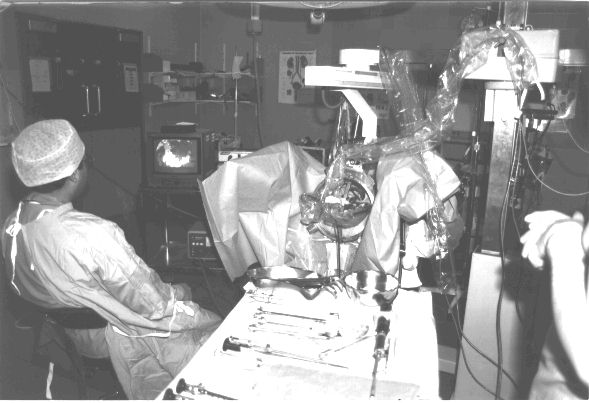
The Probot in the operating theatre. The surgeon is sitting to the left with his hands completely free of the patient and robot [Photograph: Q.Mei].
Contact details
Prof. Ferdinando Rodriguez y Baena
Co-Director Hamlyn Centre, Professor in Medical Robotics
Prof. Brian Davies
Senior Research Investigator