Prostate cutting sequence
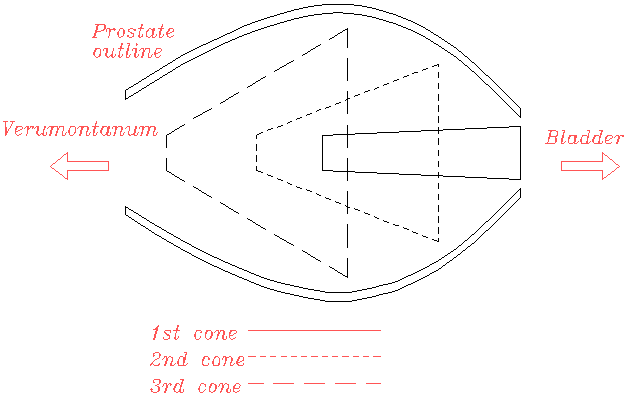
Theoretically, it is possible to combine motions of the motors within the robot to sweep out smooth curved cuts from within the prostate. Initially, however, to ease the control strategy and ensure safety (as it is easier to write a safe simple controller than a complex one), the robot has been programmed to move just one axis at a time, with the result that the cavity is formed as a sequence of overlapping cones. In theory, the cone is the largest shape than can be cut, in reality the base shape of each 'cone' is set by the surgeon. The following drawing shows a somewhat exaggerated series of overlapping cones. In reality cones near the bladder neck would be closer together to minimise the steps that the procedure produces in tissue.

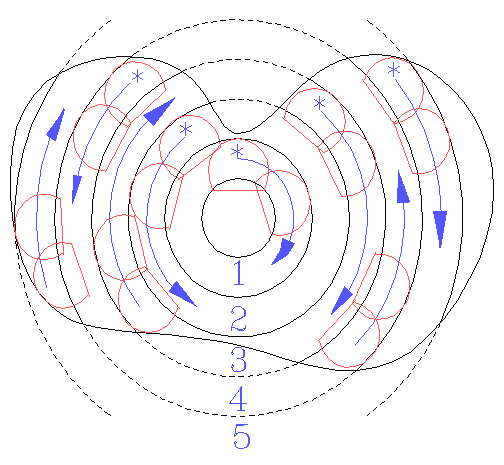
Each of the overall cones consists of a sequence on concentric smaller cones. Starting at the centre (urethra), the robot cuts a small cone by making a cut, rotating a little and then making the next cut. This process is repeated until it has finished the small cone. It then reverses direction and proceeds with a cone a little larger. This is repeated until the volume up to the boundary as specified by the surgeon has been reached.

The above sketch shows a possible prostate boundary drawn by the surgeon. This will be cut in five rings of cones, starting at the centre (1) and moving outwards. Note that the shape is irregular so some of the rings of cuts will not be complete circles. For simplicity only the first two cuts in each ring sequence are shown. The arrows indicate the direction of progress and the *s indicate the first cut to be made in each ring. Adjacent cuts and rings are overlapped slightly to ensure that all tissue is removed.
Contact details
Prof. Ferdinando Rodriguez y Baena
Co-Director Hamlyn Centre, Professor in Medical Robotics
Prof. Brian Davies
Senior Research Investigator