Due to COVID-19, staff and students in the Department of Earth Science and Engineering are working and studying remotely.
For latest updates on the situation, including messages to staff and students, guidance on remote working, and support for mental and physical health, visit the College's COVID-19 information pages.
To support each other during this time, and maintain our values the Graduate Society, ESE Grad Soc, is collating information, recipes, exercises and competitions. These are sent out each Monday, and will be added here.
Get Talking
If you want to share a message with the ESE community, just post it on Twitter with the hashtag #ESEGetTalking and @ESEGradSoc or get in touch with @ImperialRSM, and we’ll retweet as many as possible. We have never needed each other more. So, come on ESE, get talking. Daily coffee at 11am and weekly Fribes are happening remotely, email GradSoc for the link to join.
ESE Updates
In these times, as we continue with working remotely, it is important to stay connected.
Sometimes however, this can feel overwhelming. This new format newsletter from the Department, which collates various information and news that in the past has come separately, aims to keep you updated with the Department and colleagues' news, useful information and reminders. You will also find a wealth of information on the College Covid-19 Updates and Guidance webpage.
Each week we run a photo competion for ESE Staff, Post-Doctoral Researchers, and PhD Students, with themes spanning everything from "ESE Pets" to "Working from Home Views" to "Lockdown Meals". See some of the winners below!
Plants Winner - "Things Are Looking Up" by Ahmed M Selem
Fossils Winner - "Opal Ammonite (ft. suture lines!)" by Sinead Lyster
Fossils Runner Up - "Freckles, Flecks, and Speckles" by Zainab Titus
Urban Geology Winner - "Once upon a time, sandstone blocks were used to build this piece of art, Luxor Temple, Egypt" by Mahmoud Nourelyamani
Recreate a Painting/Artwork Runner Up - "His Master's Voice" by Sarah Robinson
Lockdown Summer Winner - "Finding silver linings during lockdown" by Ruth Davey
Picnic and BBQ Runner Up - "Order's Up!" by Catrin Harris
Sunrise and Sunset Winner - “Sunset over the Sea” by Harshit Agrawal
Sunrise and Sunset Runner Up - “First Sunset” by Lior Suchoy
Travel Winner - “Machu Picchu, Peru” by Ahmed Selem
Travel Runner Up - “Manarola, Cinque Terre, Italy”
Working from Home Runner-Up - "Making the most of the sunshine" by Evie Baker
Stress Less Runner Up - "Yoga with Hunter the Dog" by Sarah Robinson
Stress Less Winner - "Sounds of the Sea" by Harriet Dawson
Rock Formation Winner - "The Best Rock Formation I could think of- I'm not a Geologist!" by Diego Mesa-Peña
ESE Pet Winner - Josh Rasera (and Murphy)
Lockdown Meals Runner Up - "Egg-squisite Curry" by Kartikeya Sangwan
Working from Home Winner - "Offline Work in the Warmest Hours" by Robin Thomas
Plants Runner Up - "Still Alive" by Rayssa Martins Pimentel
Rock Formation Runner Up - "The Queen of All Salt Mines, Realmonte, Italy" by Sian Evans
Lockdown Hobbies Runner Up - "Propagating Baby Pancake Plants in Prosecco Glasses" by Sinead Lyster
Workout of the Week
Maintaining a fit and healthy lifestyle may prove to be a tough challenge during the lockdown, so it is understandable that it may taken a back seat over the past few weeks. Many people have got in the habit of regular walks or cycles, making the most of the once-daily outdoor exericse allowance. Exercising is a great way to improve your mental health and, with a little more time on our hands and some energy to burn, there is no time like the present to try some home workouts.
Yes, it’s long been a joke that all geologists do is colour in. But, it can’t be denied, colouring in is rather fun. Turning stress into art is as simple as printing out some free colouring pages or cracking open an adult colouring book, like the popular Secret Garden book. You might like to try a colouring sheet of the Flatirons in Boulder, Colorado (Feel free to send us your finished masterpieces).
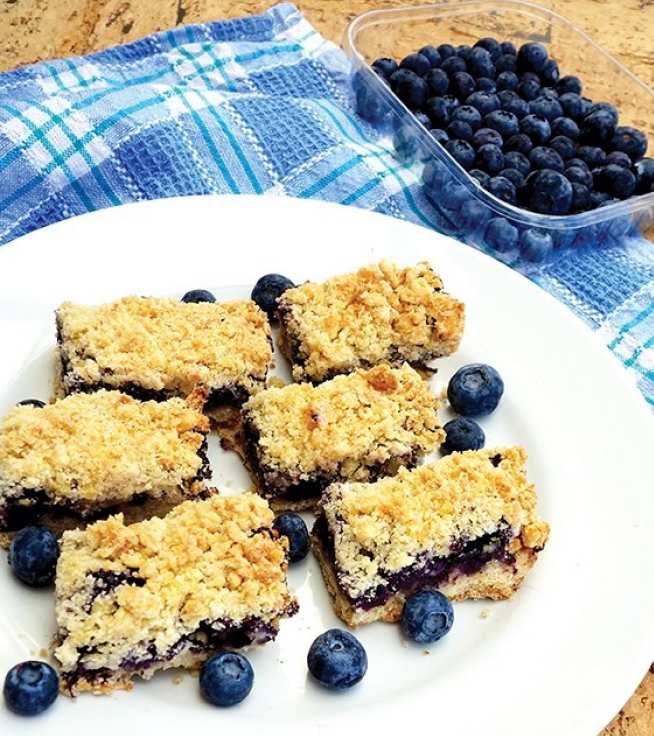
These store-cupboard friendly crumble bars are very adaptable, and a perfect baking project to have up your sleeve during a lockdown. Don’t have fresh or frozen fruit? Substitute 360g of jam for the berries and icing sugar.
Ingredients
Crumble Bars
120g butter or coconut oil
360g flour of your choice (plain, wholegrain, and gluten-free flours all work fine)
180g rolled oats
120g brown sugar
1 tsp salt
1 tsp baking powder
360g fresh or frozen berries
60g icing sugar
Method
Preheat the oven to 180°C. Line the bottom of a 9x13 inch baking tray with baking paper or foil, leaving an overhang on each end. Lightly coat the paper and pan with cooking spray.
Melt the butter or coconut oil. In a bowl, mix together the flour, oats, brown sugar, salt, and baking powder. Pour in the melted butter and mix till thoroughly combined. The mixture will be crumbly (it is a crumble, after all). Press half the flour-butter mixture into the tray to create a level crust. Place the crust in the preheated oven for 20 minutes, until golden brown.
Remove from the oven and let cool slightly. Toss together the berries and the icing sugar, then evenly distribute them over the top of the crust. Sprinkle the remaining flour-butter mixture evenly over the top of the berries. Return the tray to the oven and bake for an additional 30 minutes, until the berries are bubbling in the middle of the tray and the topping is lightly browned.
Let cool completely before cutting. Enjoy!
No Churn Pomegranate Ice Cream
No Churn Pomegranate Ice Cream
Summer is almost here and that means only one thing – it’s ice cream season! This week’s recipe comes from Nigella Lawson's website.
Made with just 4 ingredients there is no need for any fancy equipment, ice cream makers, or special tools!
In the words of Nigella, “this delicate pink ice cream tastes like fragrant, sherbety heaven”.
Juice two of the pomegranates and the lime and strain the juices into a bowl. Save the third pomegranate to use the seeds only.
Add the icing sugar and whisk to dissolve.
Whisk in the double cream and keep whisking until soft peaks form in the pale pink cream. (If using American heavy-cream or whipping cream in other countries, whisk your cream in a bowl first, until it reaches soft peaks, then whisk in the other ingredients and continue whisking until thick again.)
Spoon and smooth the ice cream into the airtight container of your choice and freeze for at least 4 hours, or overnight.
Scatter with some pomegranate seeds before you eat it.
Note: You can use 175ml of pure pomegranate juice, such as POM, in place of juicing the two pomegranates.
Nigella’s website has lots of other recipes for different flavours of no-churn ice cream, or you can invent your own flavours! Simply make the basic vanilla ice cream, sprinkle in a handful of add-ins and freeze as directed. Or swap the vanilla for your favourite extracts.
2 small onions (200g/7oz in total), finely chopped
2 x 400g tins chickpeas, rinsed and drained
4 garlic cloves, grated
3 tsp ground cumin
2 tsp ground coriander
2 tsp sea salt flakes
30g/1oz coriander leaves, roughly chopped
30g/1oz flatleaf parsley leaves, roughly chopped
40g/1½oz plain flour
freshly ground black pepper
olive oil spray
For the Tzatziki:
200ml/7oz 0% fat plain yoghurt
140g/5oz piece cucumber, grated
1 small garlic clove, finely grated
2 tbsp finely chopped mint leaves
pinch sea salt
pinch granulated sweetener (optional)
Method
Preheat the oven to 230C/210C Fan/Gas 8 and line a baking tray with baking parchment.
Heat the olive oil in small frying pan over a medium heat. Add the onions and cook for about 10 minutes, or until softened and starting to brown (add a splash of water if they start to stick). Remove from the heat and leave to cool.
Put the onions, chickpeas, garlic, spices, salt, chopped herbs, flour and some pepper in a food processor. Pulse until the mixture is fairly smooth, stopping every so often to scrape down the sides with a spatula. You want to retain some texture but the paste should be able to hold together.
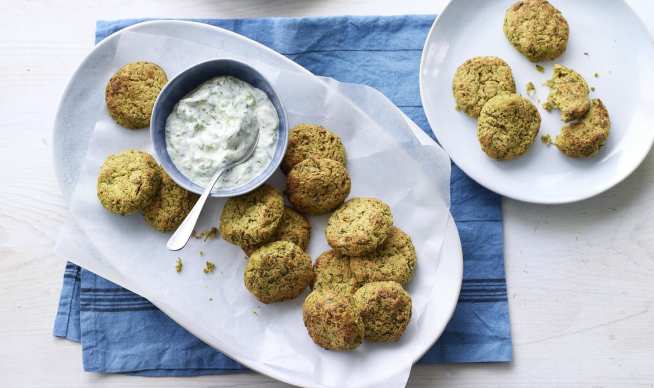
Divide the mixture into 18 equal pieces and shape into patties. Place on the prepared baking tray and spray the patties with 10 sprays of oil. Cook on the top shelf of the oven for 20–25 minutes, or until golden-brown.
For the tzatziki, put the yoghurt into a small bowl. Squeeze the grated cucumber to remove excess liquid, then add to the yoghurt with the garlic, mint, salt and sweetener. Mix well.
Lower the oven setting to 200C/180C Fan/Gas 6 and move the tray of falafel to the bottom shelf of the oven. Bake for a further 20–25 minutes, or until cooked through. Sprinkle with a little salt and serve with the tzatziki.
Tips: Don’t forget to give the cucumber a squeeze to prevent the tzatziki being too wet!
Homemade Chunky Guacamole
Homemade Chunky Guacamole
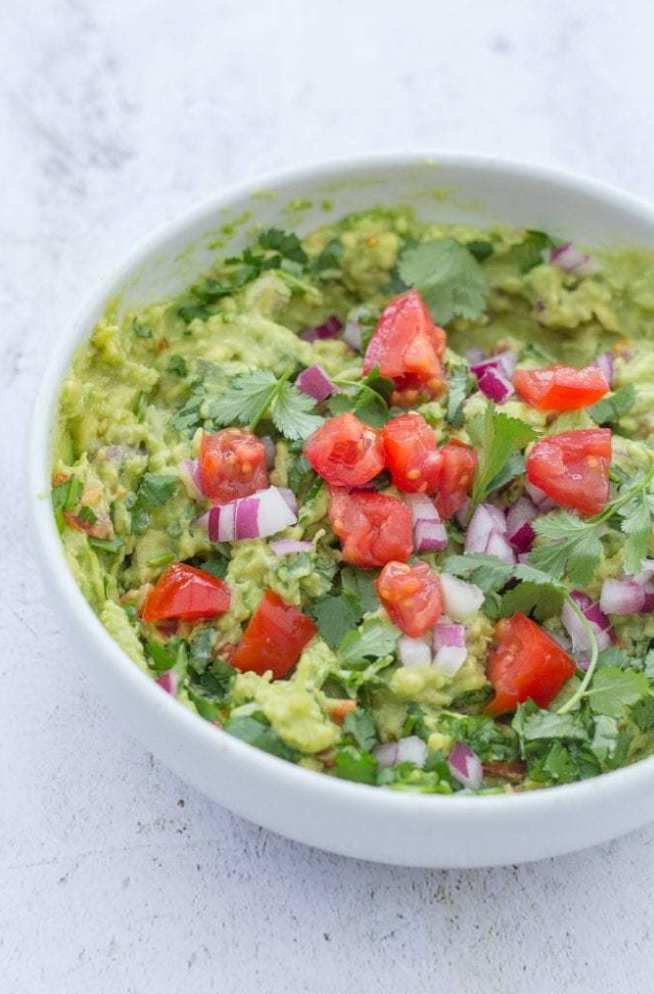
This week’s recipe comes from the Easy Peasy Foodie blog. Quick, easy and utterly delicious, this Homemade Chunky Guacamole recipe is set to knock your socks off! Perfect for pairing with all your Mexican favourites, it’s a real crowd-pleaser and can be made in well under 10 minutes. It’s also vegetarian, vegan, dairy free and gluten free.
½ - 1 chilli, very finely diced and seeds removed (optional)
2 avocados, skins and stones removed
6 cherry tomatoes, diced
10 g coriander, finely chopped
Salt and pepper to taste
Method
Place the diced red onion and lime juice in a bowl and stir. Leave for 1 minute (this will take the harsh edge of the onions).
Add the garlic (and chilli, if using) and stir again.
Add the avocados to the bowl and mash roughly using a fork.
Add the cherry tomatoes, most of the coriander, plus some salt and pepper and stir everything together, taking care not to stir too much or your guacamole will lose its chunkiness.
Taste the guacamole and if necessary add extra lime juice/salt/pepper/chilli to your liking.
Serve topped with the remaining coriander.
Tip: make sure you soak the onions in the lime juice before adding the rest of the ingredients - it makes such a difference. The onions lose their harsh edge and become sweet and delicious, and the flavour of the onions seeps into the lime juice, flavouring the whole guacamole in a delicious but subtle way.
If you prefer a smoother guacamole, the blog also features a recipe for Easy Peasy Guacamole - a smoother, blended version.
Raspberry Cheesecake Bars
Raspberry Cheesecake Bars
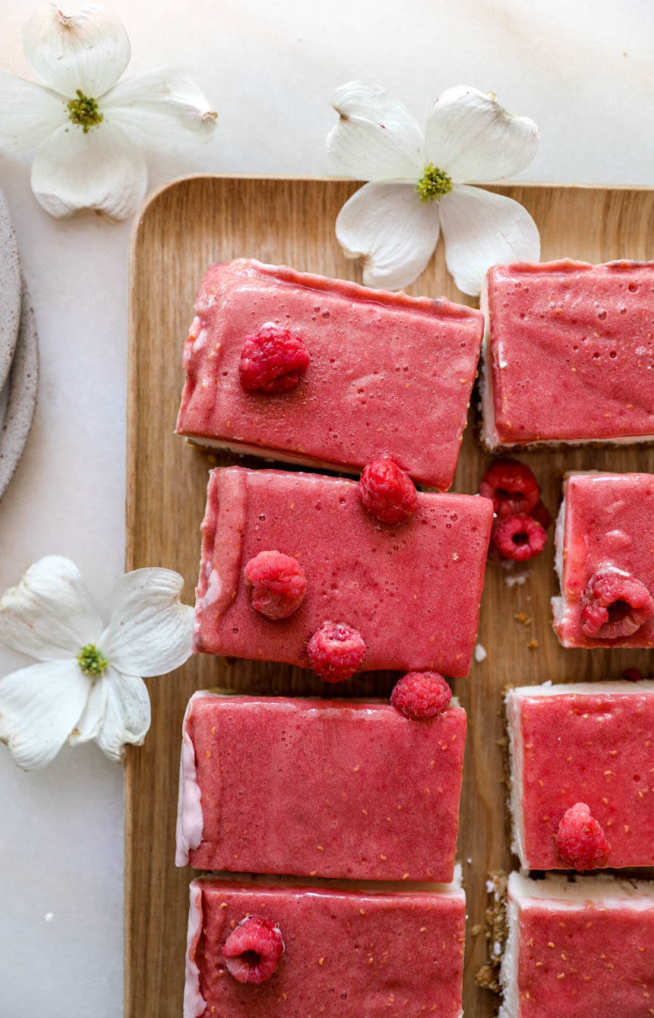
This week’s recipe comes from the 'Foods of Jane’ blog. It is dairy free and suitable for vegans!
225g digestive biscuits (McVities Original Digestives are now suitable for vegans)
60g melted vegan butter
2 tbsp honey or maple syrup
For the filling:
450g vegan cream cheese
170g coconut milk
1 tsp vanilla extract
1 tbsp fresh lemon juice
4 tbsp (~80g) maple syrup
For the raspberry puree:
225g chilled raspberries
1 tbsp lemon juice
2 tbsp honey or maple syrup
Method
Preheat the oven to 180 C.
Form the crust by blending the digestive biscuits, butter and honey/maple syrup in a food processor until it starts to stick together a bit.
Line a deep 8x10” baking pan with parchment paper and spray or rub any exposed edges of the pan with coconut oil. (This recipe also works with a mini 8x4” baking dish – just results in slightly thicker layers!)
Press the crust down into the pan so that it's an even flat layer and bake in the oven for 12 minutes at 180 C.
Put the finished crust in the freezer immediately so that it's cool once you're ready to add the cheesecake filling.
Blend the cheesecake filling ingredients in a food processor or stand mixer with the whisk attachment until smooth. Add the filling to the baking pan on top of the cooled biscuit crust, spread it out evenly and then put the pan back in the freezer for at least an hour.
Add the chilled raspberries, lemon juice and honey/maple syrup to a blender and blend until combined. Add it on top of the chilled cheesecake and spread it out into an even layer.
Return the whole thing to the freezer for 3 hours or overnight before removing it and slicing to serve! Let it thaw for at least 15 minutes before slicing it up. (Crucial because it breaks apart if it's too hard and frozen).
Kinder Bueno Cookie Bars
Kinder Bueno Cookie Bars
This week’s recipe comes from the “Jane’s Patisserie” blog. These gooey, delicious Kinder Bueno Cookie Bars are packed full with Kinder Chocolate and Kinder Bueno pieces!
If you want to make these into a chocolate cookie dough, rather than a ‘plain’ one, you can add in 25g of cocoa powder, but take out 50g of the plain flour. (The cocoa powder dries the cookie dough out more in comparison to the flour, so you need slightly less dry ingredients). If you want to make these into actual cookies rather than bars, you will need to add in 50g more flour, so that they don’t spread too much!
Ingredients
Kinder Bueno Cookie Bars (C) 2020 Jane's Patisserie
275g plain flour
1 tsp bicarbonate of soda
½ tsp salt
1 tbsp cornflour
115g unsalted butter
55g granulated sugar
135g light brown sugar
1 medium egg
1 tsp vanilla essence
250g Kinder Maxi chocolate, chopped
170-250g Kinder Bueno bars, chopped
Method
Preheat your oven to 190C/170C fan, and line a 9x9inch square tin with parchment paper, and leave to the side for now.
Whisk together the plain flour, bicarbonate of soda, salt and cornflour in a bowl and set aside.
Melt the unsalted butter and add to another bowl. Add in the light brown sugar and granulated sugar and whisk the mixture together for two minutes by an electric whisk, or three minutes by hand.
Add in the egg and vanilla and whisk again until combined.
Add in the dry ingredients and mix until a really thick cookie dough is formed.
Add in the chopped Kinder Chocolate, and chopped Kinder Bueno, and fold through. Reserve some of the Kinder Chocolate for the top of the cookie bars.
Push the mixture into the 9x9inch tin, and add on the last few bits of Kinder goodness.
Bake the cookie bars in the oven for 17-22 minutes. I usually do 19 minutes so they stay reasonably gooey.
Once baked, leave in the tin for 10 minutes to cool a bit, and then remove and cool fully on the wire rack. Enjoy!
Small Batch Basque Burnt Cheesecake
Small Batch Basque Burnt Cheesecake
Prep Time: 10 mins
Cook Time: 20 mins
This week’s recipe comes from the ‘I am a Food Blog', a recipe & travel blog written by husband and wife team Mike & Steph.
This extra-small gluten-free Basque cheesecake has a hint of burnt caramel that will win your heart on its way to your tummy.
Line a small loaf pan (6×3 inches) with baking paper. Preheat the oven to 230°C.
Beat together the cream cheese and sugar until very smooth and fluffy, making sure all the sugar is dissolved. If you’re super particular, melt the cream cheese along with the sugar in a bowl over a double boiler.
Add the egg and beat until smooth.
In another bowl, add the cornflour and tiny bit of cream, whisking until smooth, ensuring that the cornflour doesn’t lump up. Slowly stream in the remaining cream, whisking until very smooth.
Slowly pour the cream and cornflour mix into the cheese mix. Mix well to ensure everything is combined.
Bake for 20 minutes or until the top is very dark and charred but the middle still has a bit of a jiggle. Broil for a couple of minutes to get extra char if desired. Let cool on a wire rack until room temperature. Remove from the tin, slice, and enjoy!
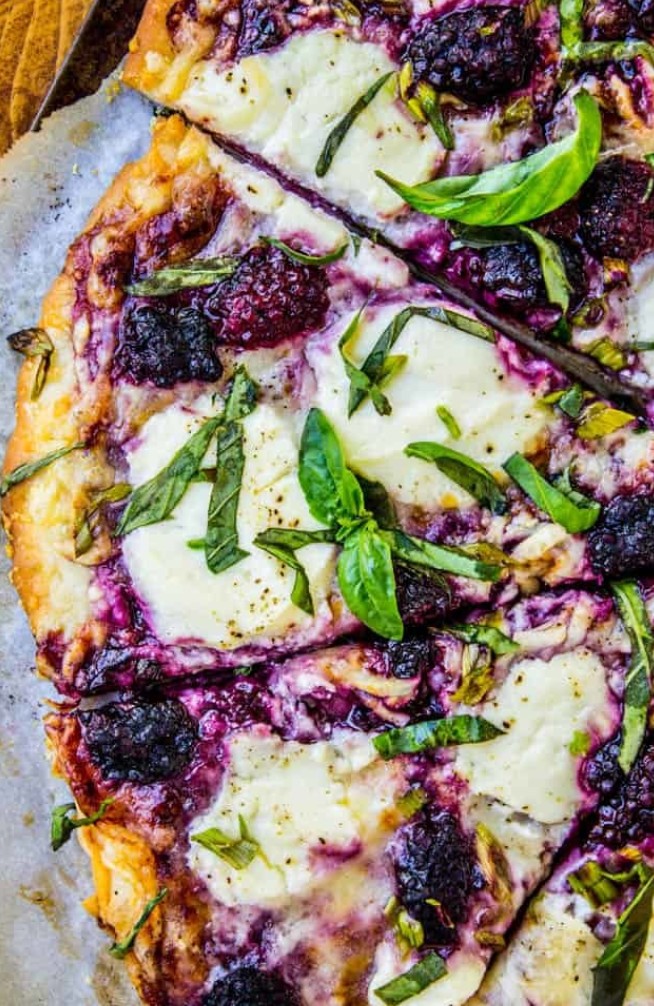
Blackberry Ricotta Pizza with Basil
Blackberry Ricotta Pizza with Basil
This week’s recipe comes from ‘The Food Charlatan’ blog. As temperatures rise, we're all in the mood for easy summer recipes to cool us off—and we're not just talking homemade ice cream..! Many of the best fruit desserts are ready made for summer—hello, berries! Which brings us to blackberries: whether you're getting your particular haul from the supermarket, the local farmers market, or you're lucky enough to be able to pick your own, you know that blackberries are at their ripest and most delicious when the days are long and the air is warm. In fact, the hotter the season, the sweeter the blackberries seem to get.
So what better way to kick off berry season than with a blackberry recipe? And this one is simple ricotta pizza for lazy summer nights! It is mostly cheese and blackberries, which is a fabulous combo. Add some basil on top to make things a little more sophisticated, and you are on your way to an easy dinner the whole family will love! Besides being tasty, blackberries are also very healthy. They're a great source of fibre, vitamin C, and vitamin K, so you can enjoy these dishes without guilt. Plus, who doesn’t love diving into a pretty purple plate. So what are you waiting for? Get picking!
Preheat your oven to 230°C. Put your pizza stone in the oven if you have one.
Roll out your pizza dough on a floured sheet of parchment paper to about 12 inches. (If you don't have a pizza stone, you should probably transfer the dough to a baking sheet now.)
Drizzle 1 tablespoon of olive oil over the top of the dough and use your fingers or a pastry brush to coat well, especially the edges.
Use a fork to mash a 70g fresh blackberries in a bowl. It doesn't have to be perfect. Use the fork or a slotted spoon to ladle the pulp onto the pizza. Spread it around like you would pizza sauce. (You don't need the remaining juice, but don't throw it out. Drink that sweet nectar, if you know what's good for you).
Top the smashed berries with 100g Parmesan and 100g swiss cheese or mozzarella, making sure to get the crust.
Use a spoon to dollop the ricotta over the pizza. It doesn't have to be perfect.
Top with whole fresh blackberries and chopped spring onions.
Sprinkle with salt, and add pepper to taste.
When the oven is hot, transfer the pizza to the oven. I transfer it using a flat baking sheet, still on the parchment paper.
Bake for about 8-10 minutes, or until the top has started to brown. You can grill it for a minute if you want it crispier on top.
Remove from the oven and immediately sprinkle some chopped basil on top. Slice and enjoy!
Note: This recipe is really easy to double to make 2 pizzas, and then it would come closer to feeding a family of 4, if you include some sides.
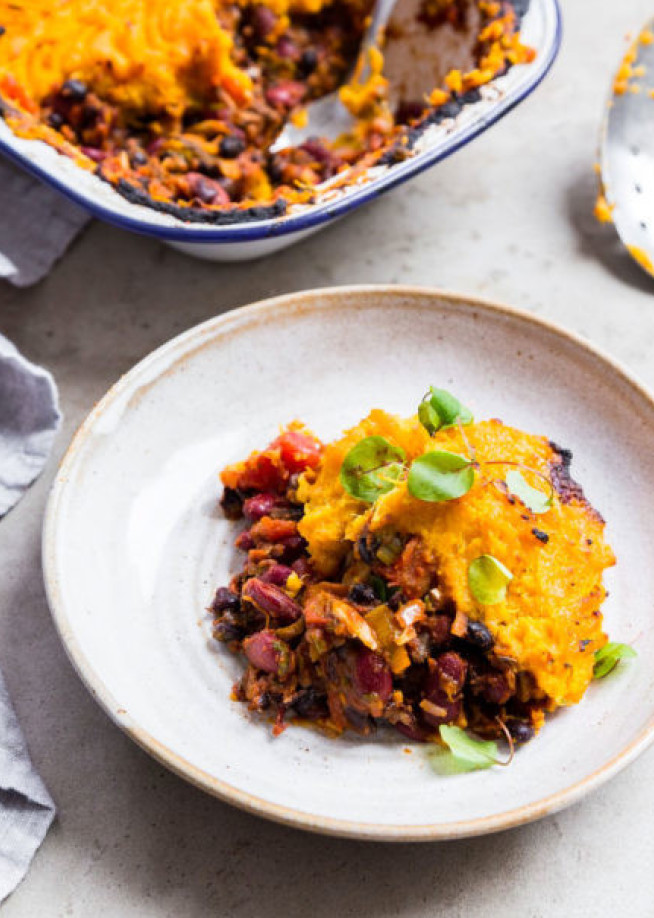
If you’ve not heard of Ella Woodward, where have you been? Here’s the low-down: after being diagnosed with postural tachycardia syndrome, Ella underwent a complete lifestyle change and now focuses solely on eating and creating whole, plant-based foods. On Deliciously Ella she features incredibly healthy versions of typically unhealthy dishes. She has her own app, five cookbooks and a deli in Central London. Most recently you might have seen her appearance on the London episode of ‘Down to Earth with Zac Efron’ on Netflix – also a great series to watch, if you haven’t already...
This Shepherd's pie recipe is ridiculously moreish, and is vegetarian and vegan friendly! The beans are sautéed with red onion, garlic, maple, coriander, lime juice, spring onions, mushrooms and tomatoes, until they’re soft and full of flavour, before being baked under a layer of sweet potato mash.
600g sweet potato, peeled and cut into small cubes
Small splash of almond milk
230g black beans (drained weight), drained and washed
230g red kidney beans (drained weight), drained and washed
400g can tinned tomatoes
150g button mushrooms
4 spring onions, sliced
1 large red onion, peeled and finely diced
2 garlic cloves, peeled and finely diced
1 tablespoon maple syrup
Handful fresh coriander, roughly chopped
Teaspoon smoked sweet paprika
Juice of 1 lime
Salt and pepper to taste
Olive oil
Method
Preheat the oven to 200°C, grill setting.
Boil the peeled sweet potatoes until tender, about 30 minutes. Drain and leave to one side.
Fry the onions, garlic and a pinch of salt, in a drizzle of olive oil over a medium heat for 5 minutes, until the onion softens. Add the paprika and slices of spring onion, sauté for 2-3 minutes, ensuring they are coated in the paprika, before adding the mushrooms and mixing again.
Add both of the beans, coating them in the paprika, and sauté for a further 5 minutes. Then add the tinned tomatoes, maple syrup, lime juice, pepper and coriander, mixing everything through.
Once the sweet potatoes are soft, mash them with the almond milk and a pinch of salt.
Spoon the bean mix at the bottom of a baking tray and top with the sweet potato mash. Place in the oven to grill until it starts to crisp on the top, about 20-25 minutes.
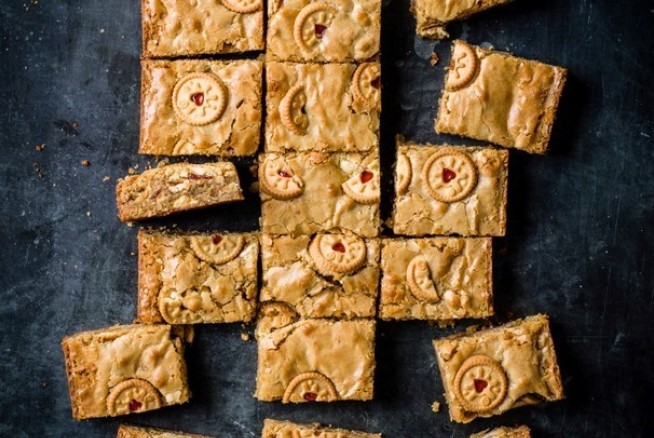
Jammie Dodgers Blondies
Jammie Dodgers Blondies
This week’s recipe comes from the 'olive magazine' blog. Smarter than your average food mag, olive is the stylish, monthly magazine for food lovers. Triple-tested seasonal recipes from an expert cookery team and chefs of the moment, plus restaurant reviews and foodie travel!
Check out these super easy super fun blondies using a children's classic biscuit, Jammie Dodgers. These fudgy moreish white chocolate blondies are a great alternative to a traditional chocolate brownie, and will go perfectly with your afternoon cuppa!
200g unsalted butter, diced (plus extra for the tin)
250g light brown soft sugar
100g light brown muscovado sugar
200g white chocolate, chopping into small chunks
275g plain flour
3 eggs
1 tsp vanilla essence
24 mini Jammie Dodgers, 10 roughly chopped, 14 left whole or halved
Method
Preheat the oven to 190C/fan 170C/gas 5. Butter and line a rectangular 20 x 30cm brownie tin with baking paper.
Gently heat the butter in a large pan for about 5 minutes until it’s golden brown and smells nutty. Add the sugars and 1/2 the white chocolate. Stir over the heat until melted and fully combined. Tip into a bowl and cool for 5-10 minutes until at room temperature.
In another bowl, sift the plain flour and mix in ¼ tsp of salt.
Add the eggs one at a time to the cooled butter and sugar mix, ensuring each egg is well combined. Stir in the vanilla, then fold in the flour. Stir in the rest of the white chocolate and the roughly chopped Jammie Dodgers.
Spoon the mixture into the baking tin and spread until even. Gently press the whole or halved Jammie Dodgers into the mixture so you can still see them. Bake in the oven for 25-30 minutes or until risen and golden. Cool in the tin, then cut into 18 squares.
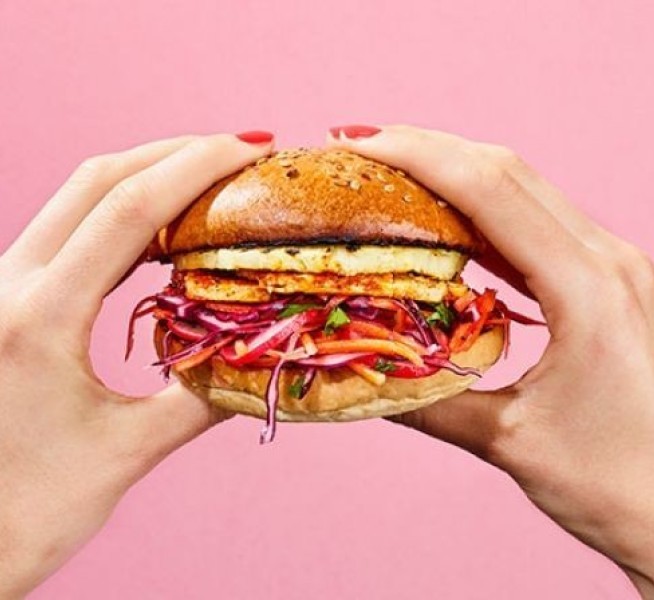
Pack four of your 5-a-day into these tasty veggie burgers with barbecued halloumi. Wrap in lettuce cups instead of buns for a healthy, low-calorie option.
1 Little Gem lettuce, divided into 4 lettuce cups, or 2 small seeded burger buns, cut in half, to serve (optional)
Method
Heat the barbecue.
Put the cabbage, carrot, radish and coriander in a bowl. Pour over the lime juice, add ½ tbsp oil and the chilli flakes, then season with salt and pepper. Give everything a good mix with your hands. This can be done a few hours before and kept in the fridge.
Mix the remaining oil with the chipotle paste then coat the halloumi slices in the mixture. Put the halloumi slices on a sheet of foil and put on the barbecue with the pineapple (or use a searing hot griddle pan if cooking inside). Cook for 2 mins on each side until the cheese is golden, and the pineapple is beginning to caramelise.
Brush the buns with the remaining chipotle oil, then put your burger buns, if using, cut-side down, on the barbecue for the last 30 seconds of cooking to toast.
Assemble your burgers with the lettuce or buns. Start with a handful of the slaw, then add halloumi and pineapple. Serve with the remaining slaw.
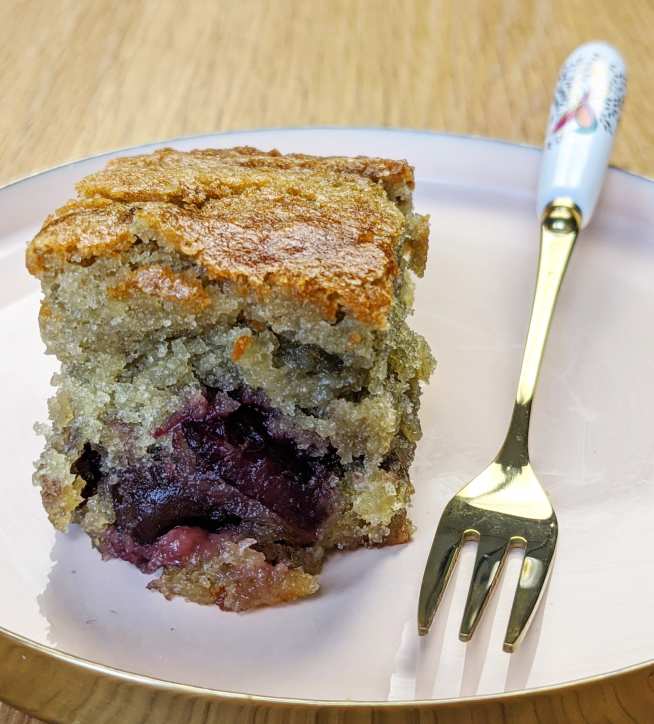
Cherry and White Chocolate Bake
Cherry and White Chocolate Bake
This recipe comes from Jack Monroe’s website ‘Cooking On A Bootstrap’, and makes 9 generous pieces from 21p each.
(Can be made vegan by replacing the eggs with apple sauce and using vegan butter and chocolate).
Jack Monroe, who goes by @BootStrapCook on social media, is asking people to send in photos of the random ingredients they have in their store-cupboards with the hashtag #JackMonroesLockdownLarder, to help them come up with a plan for what to have for dinner. Describing it as “Ready, Steady, Cook meets 28 Days Later”, it’s something we never knew we’d need. Until now... There are some really great recipes and tips, all designed for cooking on a budget - check them out.
Ingredients
Cherry and White Chocolate Bake
250g butter or baking block, 55p (55p/250g, Tesco)
200g self-raising flour, 6p (45p/1.5kg, Stockwell at Tesco)
120g frozen cherries, 50p (£2/480g, Tesco)
100g white chocolate, 30p (30p/100g, Ms Mollys at Tesco)
Method
Preheat your oven to 180°C/350°F/Gas Mark 4, and ensure there is a shelf in the centre or just below it.
Lightly – and I mean very lightly, as this is a butter-rich cake so barely needs it- grease a 20cm x 20cm small cake tin. Or thereabouts; exact measurements aren’t necessary, but bear in mind that a slightly larger tin will cook faster as the traybake will be more shallow, and a slightly smaller one will take slightly longer as the batter will be more dense, so if deviating from the 20×20, adjust your timings to take it into account.
If you’re using frozen cherries and they’re still, well, frozen, pop them into a microwave proof bowl and zap them at full power for 90 seconds to defrost. Remove and stand to one side. (The cherries, that is, not you. Come back! Oh god, I’m turning into my Dad already.)
Dice your butter into roughly 2cm x 2cm cubes and pop it into a large mixing bowl. Add the sugar and one of the eggs, and mash together with a fork to soften the butter, until you’re able to beat it together into a sloppy buttercream consistency. Add the other two eggs and beat in well, then mix in the flour until well combined into a thick but smooth batter.
Roughly chop your chocolate into small chunks, and tip into the batter along with the cherries. Fold in briskly, then scrape the whole lot into the prepared tin. Smooth the top with the back of your spoon, making sure the batter is pushed into all four corners, then place into the oven.
Bake in the centre of the oven for 50 minutes, or until a sharp knife inserted in the centre comes out clean. Remove and allow to cool in the tin for 10 minutes to firm up, before cutting into 9 equally sized pieces (or unequally sized, depending on how much you want to share it!). Serve warm or cold.
Leftovers (ha!) will keep in an airtight container or food storage bag for up to three days, or in the freezer for three months. Defrost and warm through to piping hot to serve for best results.
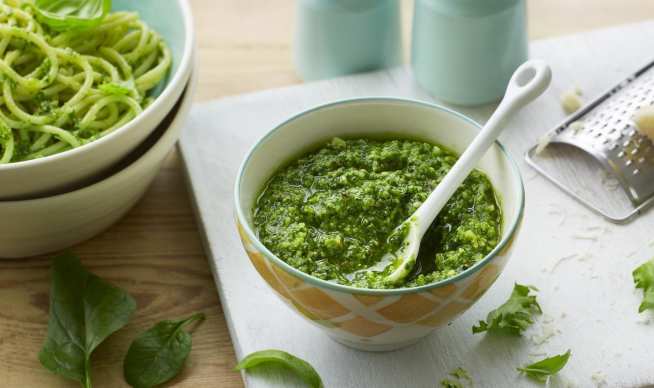
Salad Bag Pesto
Salad Bag Pesto
This recipe comes from Jack Monroe’s website ‘Cooking On A Bootstrap’, and this recipe serves 6 at 13p each.
According to Jack’s blog, bagged salad is one of the most wasted foods in Britain, with over half of it ending up in landfill. Bags of salad can be expensive to buy full price, but can often be found in the reduced chiller at the supermarket.
Ingredients
Salad Bag Pesto
150g bag of salad, (62p)
1 fat clove of garlic or 1/2 tsp garlic paste, 2p (69p/4 bulbs)
60ml sunflower oil, 7p (£1.10/1l))
20ml lemon juice, 4p (39p/250ml)
a pinch of salt, (<1p)
a pinch of pepper, <1p (43p/jar)
Method
Finely chop your salad into smithereens with a heavy, sharp knife. If you have a bullet blender or food processor you may find it easier to bung them all in here, but (on a good hands day) there is a vigorous satisfaction in grinding a blade repeatedly into a bunch of leaves until they resemble a small pile of dust.
Pop the tiny pieces of leaf into a bowl. Peel and finely chop your garlic, if using fresh cloves, and add that too, or a teaspoon of garlic paste
Add the oil, lemon juice, salt and pepper and mix well. Store in a jar in the fridge for up to 4 days, or in the freezer for a few months.
You may want to add finely grated cheese to it to make something more closely resembling a traditional pesto, which would be a marvellous addition.
Serving suggestion: warm over spaghetti with a couple of very finely chopped tomatoes folded through and a smattering of extra pepper.
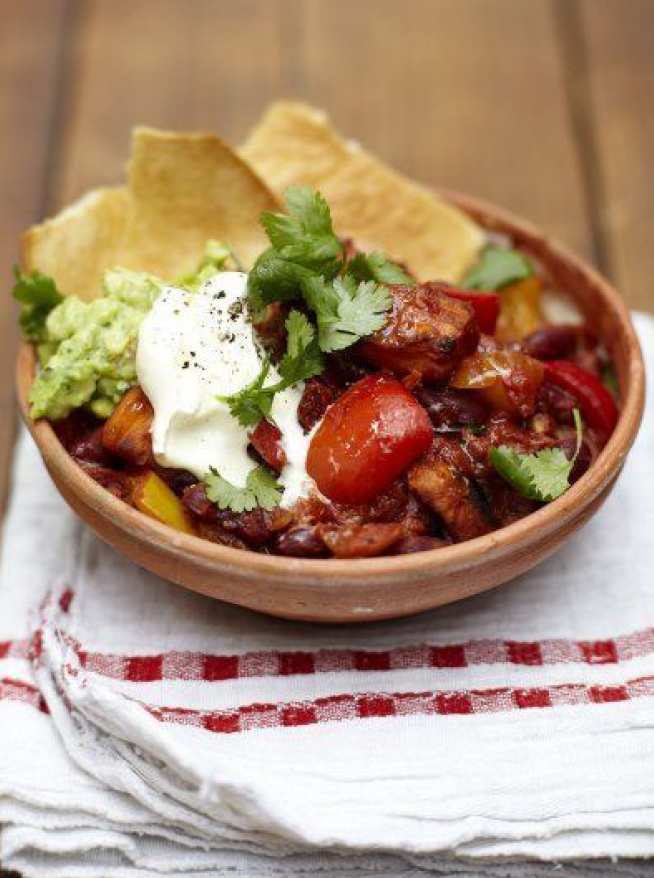
Veggie Chilli
Veggie Chilli
This week’s recipe comes from Jamie Oliver's website and is a delicious veggie alternative to traditional chilli con carne that can be tweaked depending on what you have available in your cupboards.
Use butternut squash or regular potatoes instead of sweet potatoes.
No onions? Try using a leek or a few spring onions.
Cayenne pepper has been used here, but paprika would be equally delicious.
Jamie’s show “Keep Cooking And Carry On”, on Channel 4, features easy-to-follow recipes tailored for the nation on lockdown. The show is packed with easy and delicious recipes that the whole family can enjoy, plus lots of ideas for simple swaps and ways you can make the recipes work with what you’ve got.
1 level tsp cayenne pepper, plus extra for sprinkling
1 heaped tsp ground cumin, plus extra for sprinkling
1 level tsp ground cinnamon, plus extra for sprinkling
Olive oil
1 onion
2 mixed-colour peppers
1 bunch fresh coriander (30g)
2 garlic cloves
2 fresh mixed-colour chillies
2 x 400g tins beans, such as kidney, chickpea, pinto, cannellini
2 x 400g tins plum tomatoes
Lime or lemon juice, or vinegar, to taste
Method
Preheat the oven to 200C/400F/Gas 6. Peel and chop the sweet potatoes into bite-sized chunks, then place on to a baking tray.
Sprinkle with a pinch each of cayenne, cumin, cinnamon, salt and black pepper, drizzle with oil then toss to coat. Roast for 45 minutes to 1 hour, or until golden and tender.
Peel and roughly chop the onion. Halve, deseed and roughly chop the peppers, then peel and finely slice the garlic. Pick the coriander leaves, finely chopping the stalks. Deseed and finely chop the chillies.
Meanwhile, put 2 tablespoons of oil in a large pan over a medium-high heat, then add the onion, peppers and garlic, and cook for 5 minutes, stirring regularly.
Add the coriander stalks, chillies and spices and cook for a further 5 to 10 minutes, or until softened and starting to caramelise, stirring occasionally.
Add the beans and the juice. Tip in the tomatoes, breaking them up with the back of a spoon, then stir well.
Bring to the boil, then reduce the heat to medium-low and leave to tick away for 25 to 30 minutes, or until thickened and reduced – keep an eye on it and add a splash of water to loosen if needed.
Stir the roasted sweet potato through the chilli with most of the coriander leaves, then taste and adjust the seasoning if needed.
Finish with a squeeze of lime or lemon juice or a swig of vinegar to taste, then scatter over the remaining coriander.
Delicious served with yoghurt or soured cream, guacamole and rice or tortilla chips.
Chocolate Fondant
Chocolate Fondant
This week’s recipe comes from David Lebovitz’s online blog, and was written by chef Emily whilst they are on lockdown in Paris.
Now is the time to mess up the kitchen, leave edges rough, make substitutions and mistakes, and enjoy the process!
Ingredients
Chocolate Fondant
100g butter
100g chocolate, chopped
130g sugar
50g plain flour
3 large eggs
Pinch salt
Method
Set the oven to 180C (350F) and butter 6 ramekins (not sure what size mine are but they hold 130ml water when filled to the top).
Gently melt the butter and chocolate together in a heatproof bowl, either over a saucepan of boiling water or in the microwave.
Stir together, then whisk in the sugar, flour, eggs and salt (either with an electric whisk or just vigorously by hand).
Fill the ramekins until ¾ full and bake for 12-14 minutes, until the tops are squishy but set (like an undercooked cake). If you’re making ahead, you can also pop the mixture in the fridge and cook later (about 14-16 minutes in the oven if they are cold).
Serve with vanilla ice cream if you have it!
Vegan Sweet Potato and Chickpea Sausage Rolls
Vegan Sweet Potato and Chickpea Sausage Rolls
This week’s recipe comes from Tamsin at the online blog ‘Cup Full of Kale’. These bite sized vegan sweet potato and chickpea vegan sausage rolls are flaky and flavoursome! Shop bought puff pastry is delicious (and usually vegan!) so there is no need to make it!
Ingredients
Vegan Sweet Potato and Chickpea Sausage Rolls
(Makes 12)
2 sweet potatoes
1 tin chickpeas
1 tbsp tomato puree
1-2 tsp harissa paste
1/2 tsp ground cumin
1/2 tsp garlic granules
Handful fresh coriander
1 flax egg (1 flax egg = 1 tbsp flaxseed mixed with 2.5 tbsp water. Leave to thicken.)
1 block puff pastry
1/2 tbsp vegan butter
1 tsp poppy seeds
1 tsp sesame seeds
Method
Preheat the oven to 180C/350F.
Peel the sweet potatoes and cut into small pieces about 2cm. Drizzle with a bit of oil, salt and pepper and place in the oven.
Take your puff pastry out the fridge and leave to rest until you are ready to use it.
In a cup/small bowl mix make your flax egg by mixing 1 tbsp of flaxseed with 2.5 tbsp of water.
After about 15-20 minutes take the sweet potato out of the oven. It should be soft and starting to brown and crisp on the edges.
Place the sweet potato, chickpeas, tomato puree, harissa, cumin, garlic and flax egg in a bowl. Mix with the back of a fork or a hand processor. You want it to be mainly smooth with a few lumps for texture.
Finely chop the coriander, add and stir to combine.
Place the puff pastry sheet on a floured surface or chopping board, it should be rectangle in size. Cut it down the middle lengthwise so you have two rectangle shapes.
Divide the sausage mixture in two and place half each about 2cm in from the longest side of each piece of pastry.
Now you are going to gently roll the pastry over the sausage filling until you reach the other side. Do this for both pieces and make sure the seam is on the underside.
Line the two sausage roll pieces together and cut across the middle so you now have 4 pieces. Then cut each piece into 3 so that you have 12 sausage rolls in total.
Place them onto a lined baking sheet.
Melt the butter and brush each sausage roll and sprinkle on some of the poppy and sesame seeds. Cut a small slice in the top of each sausage roll.
Place in the oven for 20 minutes until cooked and golden brown.
Serve straight away or eat cold. You can also reheat them for about 15 minutes at 150C/300F.
Healthy Granola
The Very Best Healthy Granola
This recipe comes from the ‘Cookie and Kate’ blog, which is all about celebrating good food—"real, sustainable food that delights the senses and nourishes the body”.
This granola makes a wonderful snack or breakfast (add your milk of choice and maybe some fresh fruit). It also stores beautifully, so is great for lockdown! The recipe is also a far more healthy granola option, since it’s made with whole grains, unrefined oil and naturally sweetened. You just can’t beat freshly baked granola packed with delicious and good-for-you ingredients. Plus, homemade granola is super easy to make. You’ll only need one bowl and some basic ingredients.
1 tsp fine-grain sea salt (if you’re using standard table salt, scale back to ¾ teaspoon)
1/2 tsp ground cinnamon
100g melted coconut oil or olive oil
170g maple syrup or honey
1 tsp vanilla extract
85g dried fruit, chopped if large
Optional additional mix-ins: 60g of chocolate chips or 40g coconut flakes
Method
Preheat the oven to 180C/350F.
Line a large, rimmed baking tray with baking paper.
In a large mixing bowl, combine the oats, nuts and/or seeds, salt and cinnamon. Stir to blend.
Pour in the oil, maple syrup and/or honey and vanilla. Mix well, until every oat and nut is lightly coated. Pour the granola onto your prepared pan and use a large spoon to spread it in an even layer.
Bake until lightly golden, about 21 to 24 minutes, stirring halfway (for extra-clumpy granola, press the stirred granola down with your spatula to create a more even layer). The granola will further crisp up as it cools.
Let the granola cool completely, undisturbed (at least 45 minutes). Top with the dried fruit (and optional chocolate chips, if using). Break the granola into pieces with your hands if you want to retain big chunks, or stir it around with a spoon if you don’t want extra-clumpy granola.
Store the granola in an airtight container at room temperature for 1 to 2 weeks, or in a sealed freezer bag in the freezer for up to 3 months. The dried fruit can freeze solid, so let it warm to room temperature for 5 to 10 minutes before serving.
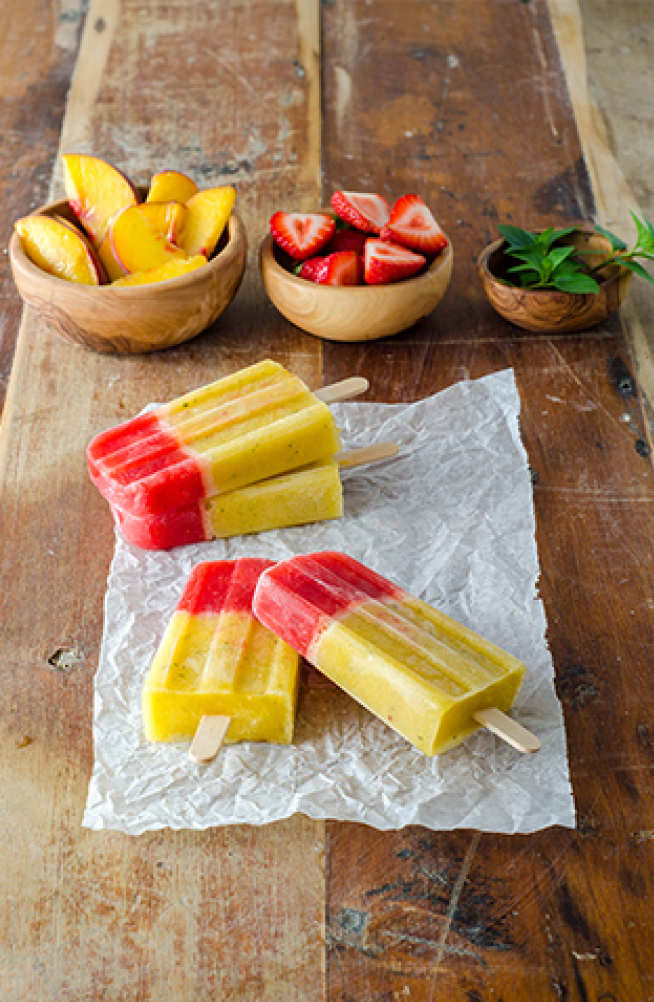
This week’s recipe comes from the ‘Chew Town’ blog by Amanda Michetti, which is all about “simple recipes with bold flavours”. As the weather is starting to heat up, we thought what better time for a more summery recipe! These Strawberry and Peach Ice Lollies are little ruby and gold beauties that have a touch of mint included to add a level of sophistication.
So, if you are craving a little sweet something after dinner or something refreshing during the day, and trying to make better food choices (at least for the month of May), why not take some of your favourite fruits and create a layered ice lolly! They are vibrant and fun and you actually feel healthier eating them.
*To make sugar syrup, combine equal amounts of sugar and water in a saucepan and heat while stirring until sugar has melted completely. Set aside to cool completely.
Method
Place strawberries, 1 tablespoon of the sugar syrup and 120ml water in the body of a blender and blend until the mixture is completely smooth.
Pour into an ice lolly mould filling each cavity up by 1/3. Add ice lolly sticks to the mould and place in your freezer for 10 to 15 minutes until the strawberry layer has started to solidify.
Cut the peaches in half and remove the stones, then roughly slice into wedges. Place the peaches, mint, remaining sugar syrup (2 tablespoons) and remaining water (240ml) into the cleaned blender and blend until the second mixture is completely smooth.
Add the peach mixture to the top of the strawberry layer and return to the freezer until frozen solid.
This week’s recipe – Chocolate & Medjool Date Brownies – comes from 'Golden Tiffin’, a Bengali food blog.
The special thing about these brownies is that they require no sugar, eggs or butter. The dates are very sweet and fudgy in nature which means that once cooked, the brownies hold their shape just as well as the traditional kind.
Makes 12 brownies in a 10x8 inch baking tray
Ingredients
Chocolate & Medjool Date Brownies
For the brownies:
150g self raising flour
1 tsp baking powder
A pinch of salt
150g (approximately 10) pitted medjool dates, soaked in boiling water for 10 minutes
150g coconut oil (or other alternative)
50g cocoa powder
100g milk chocolate, tempered in a bowl over boiling water
For the ganache:
100g tempered milk chocolate (melted in a bowl over boiling water)
A pinch salt
1 tbsp coconut oil
Any toppings you like – I’d suggest pistachios; rose petals or coconut flakes
Method
Measure out all ingredients beforehand; pit and soak the medjool dates in boiling water for at least 10 minutes and soften the coconut oil at room temperature.
Preheat the oven to 180C/356F/Gas Mark 4 and line a baking tray with greaseproof paper.
Temper (melt) 100g chocolate in a sturdy bowl over boiling water.
Drain the soaked dates and mash into a pulp by hand. Stir in the coconut oil and combine well until it becomes a paste. Fold in the tempered chocolate until the liquid has combined thoroughly.
In your main mixing bowl, sift the flour, salt and baking soda, as well as the cocoa powder.
Pour the wet ingredients into the dry and stir until a fudgy batter is formed. Since this doesn’t use eggs, the batter will be more on the solid side and should hold it’s shape if you fold into a ball.
Flatten the batter into your tin with wet hands. This ensures a smoother top and prevents the batter from sticking to your hands.
Bake for up to 15 minutes max, or until you notice a slight rise and spring to the top of the brownie.
While the brownies are cooling, temper a second batch of chocolate, this time adding a pinch of salt and coconut oil to create a silky ganache. Alternatively, you can warm up chocolate spread!
Only layer the ganache on top when the brownies are cool to the touch. Wait for the ganache to harden slightly before slicing into 12 even squares. These are best served warm with rich vanilla ice cream.
ESE Health and Safety
Due to the complex mix of risks within the department, finding out what procedures to follow and how to apply them can be a little daunting.