Breakout rooms allow meeting organisers to divide participants into smaller sub-groups. Breakout rooms can be used to facilitate discussions and brainstorming sessions amongst participants.
Only the meeting organiser can set up and run breakout rooms in Teams Meetings. Presenters and Attendees are not able to create and open breakout rooms.
Meeting organisers can:
- Create up to 50 breakout rooms and choose to either automatically or manually assign participants to rooms
- Use breakout rooms for both Team and channel meetings
- Open and close rooms more than once during a session
- Move participants between rooms
Before you start
Meeting attendees can participant in breakout rooms using any platform.
- Launch the Teams desktop app
- Select your Imperial college account user icon and then Settings
- Under the General section, check the Turn on new meeting experience option.
Setting up Breakout Rooms
Meeting Organisers will need to complete the following steps to set up breakout rooms for a Teams meeting:
- Create the breakout rooms for the meeting
- Assign the participants to their breakout rooms (this can be set to be done automatically)
- Rename the breakout rooms (optional)
- Start the breakout rooms for participants to access
Once the above steps have been completed, organisers can then choose to do the following:
- Join a specific breakout room to interact with that room’s participants
- Send an announcement to all rooms
- Reassigning participants to different rooms
- Close the breakout rooms
For full, step by step instructions on setting up breakout rooms for a meeting, please see the help materials on the Microsoft Teams support site.
Breakout Rooms Best Practice
It is important to adhere to faculty guidance when using breakout rooms with Microsoft Teams, as some departments will use an alternative method to set up breakout rooms, as listed below. Your Faculty Ed-Team will be able to offer advice and information:
- Engineering – engineering.learningtech@imperial.ac.uk
- Medicine – ASK Support Form
- Natural Sciences – fonsedtech@imperial.ac.uk
- Business School – edtechlab@imperial.ac.uk
Note: We advise that you use the above method to set up your breakout rooms, please only use the below workaround if you have been told to.
Using Breakout rooms - alternative method
For this workaround you will need to have access to a Teams site configured with the setup below:
- Type of site: Class team
- Type of access: you must be an Owner of the Teams site
- Student access: the students attending your teaching session should be Members of the Teams site
Channels within the site should include:
- a General channel in which only staff can make posts AND
- a number of public channels in which anyone can post AND/OR
- a number of private channels to which specific students have been added
Public channels can be used for sessions where privacy is not required; private channels should be used where each group needs to have an exclusive space, e.g. if the work will be assessed. Students and staff must be added individually to private channels.
The module Teams sites generated by the Banner integration follow the same template and can be used for this purpose; they include a General channel and public channels labelled Breakout Room 01-10. Additional channels can be added to these sites as required. Please note that a maximum of 30 private channels can be set up on a Teams site.
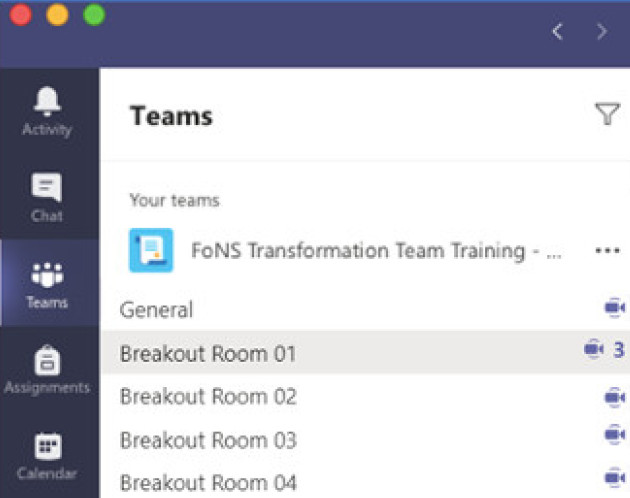
The Teams view in the left-hand panel of the Teams app shows the channels available in a team. Private channels are indicated with a padlock icon. If using private channels, users only see the channels they have access to, which makes navigation easier, but requires more setup. Some channels may not display in the list; click on the hidden channel(s) link to show these.

Setting up a meeting in the Teams site
A meeting for the teaching session can be set up using the Meet now function in the General channel of the Teams site. Please follow the instructions found on the Setting up meetings in Teams under the Meet now meeting tab to make sure that permissions are set correctly. Please note that it is best to use the desktop app, as this provides full functionality.
Providing information on groups and rooms
If set groups will be used, either in public or private channels, you can post details in advance in Blackboard or in the Teams site.
If the students have not previously taken part in a teaching event using channels as breakout rooms, it is helpful to provide information in advance, so they know what to expect. Download our Students using breakout rooms in Teams PDF (535kb) for more information.
Below are some examples of potential scenarios for setting up workaround Breakout Rooms.
Example 1
If your activity requires one member of the group to act as the group leader or scribe you can also indicate who should take on the role at this point.
After an initial introduction in the General channel you will work in your Action Teams as follows:
- Breakout Room 1 – Sangeeta and Pedro
- Breakout Room 2 - Bao and Deven
- Breakout Room 3 - Rachael and Jonathan
- Breakout Room 4 - Jafari and Zehra
When you move to your Breakout Rooms, the first-named person in each pair above should start the Meet Now meeting.
Example 2
If ad-hoc groups are needed during a teaching session, e.g. breaking into groups during a lecture for discussion, you can do this on the fly by indicating a way for the students to divide up at random. For example, if you have 20 students in your class and want 5 groups of approximately 4 students each you could use the following approach:
| Last digit of CID |
Breakout room
|
| 1 or 2 | 1 |
| 3 or 4 | 2 |
| 5 or 6 | 3 |
| 7 or 8 | 4 |
| 9 or 0 | 5 |
Example 3
Or for a class of 60, where you want subgroups of approximately 5, you could suggest students join Breakout rooms as follows:
|
Month of birthday |
Breakout room |
|
January |
1 |
|
February |
2 |
|
... |
… |
|
December |
12 |
Please note this suggestion require you to add two new Breakout Room channels (11 and 12) if you are using a standard Banner generated module Teams site.
To do this:
- Go to your class team.
- Click on more options (three ellipses).
- Click on add channel.
The method of division should be strictly random. For example, it would not be appropriate to use surname to divide the class into groups, as this would probably result in non-random groups because of the frequency of particular names in particular countries/parts of the world.
For ad-hoc groups, it is important to emphasise that only one student should set up the Meet Now meeting in each channel. Students can decide who will do this in the chat of their Breakout Room channel before they start the meeting.
Sending the groups to their Breakout Rooms
When it is time for the students to go off into their groups, give clear instructions that they should not click on Leave at the top right of the meeting in the General channel. Rather they can just navigate to their Breakout Room channel and join a new meeting there. When they join the new meeting, the meeting in the General channel will be placed on hold; they can resume participation in this meeting later. If they have problems joining the new meeting, they should leave the meeting in the General channel and re-join this later, after they leave the meeting in the Breakout Room channel.
You should provide the following information:
- What do the students need to achieve in their group
- How long will the breakout session last / when should they return to the General channel
- How to finish the meeting. You may wish to send instructions to all channels. See guidance below.
If you plan to communicate with the groups using posts or announcements (see below) you can suggest that groups designate one person to keep an eye on the Breakout Room channel chat for announcements.
Tips on teaching a session using Breakout Rooms
The following advice is from Dr Jon Fenton, of the Physics Department. Jon runs highly interactive seminar sessions using Breakout Rooms in Teams.
- Immediately after starting the breakout channels, it’s useful if the organiser sends an announcement to everyone which includes the reconvene time – otherwise people forget or misremember. If the instructions for the task in the breakout room are simple, these could be repeated in the same announcement (students often forget or were not really listening). Attachments are not allowed, but links to files could be included. The announcement can be composed beforehand ready to send at the right time.
- It is a good idea to post a PDF of the presentation materials into the General files and to suggest that students download it. It often happens that students do not remember what they need to do once they reach the breakout rooms. We sometimes experience a problem with attaching files to posts in a meeting chat, so it is safest to upload the files directly into the files tab.
- I would also suggest that say 5 minutes before the end of the allotted time, the organiser sends another message to remind groups to return at xx:xx time, in 5 minutes. Since it takes ~2mins to construct such a message, it needs to be composed with 7minutes to go! Despite these messages, we generally need to send a TA round to summon back the last two or three groups. It can easily waste 3 or 4 mins of a session if this is not done in a pro-active way.
- We set up “tag” groupings so that participants can summon a TA to their breakout room. “@TAs we need help!” etc. It is worth letting students know that they should use this method to indicate that they need assistance. They may not ask for help if they are unsure of how to do it.
- We also set up one private channel for all the TAs to discuss during the session, away from the students. We have been trialling starting a conversation in the chat in this private channel for each group in which The TAs note when they have visited a group. This can avoid leaving some groups without any attention or having other groups where a TA joins even though another has only just left. The most neglected group then ends up furthest up in the chat!
Observing the activity of students in Breakout Rooms
The Teams view in the left-hand panel of the Teams app shows meetings that are taking place in the channels of the team. If you see that more than one meeting is underway in a channel, you can go to that channel and ask all the students to move into one meeting.
You can see which students are in which meeting by entering the Breakout Room channel and looking at the top-right of the Meet now meeting.

At the end of the breakout session, when students are due to return to the meeting in the General channel, you can check which students have returned by viewing their status in the Participants window. This shows students who are On hold, i.e. still in their Breakout Room channel; those who are back in the meeting in the General channel will show with a microphone by their name.
Sending a message to all channels
It is possible to send a message to all the channels, for example, to ask everyone to return to the main meeting in the General channel or to send an important announcement to all groups.
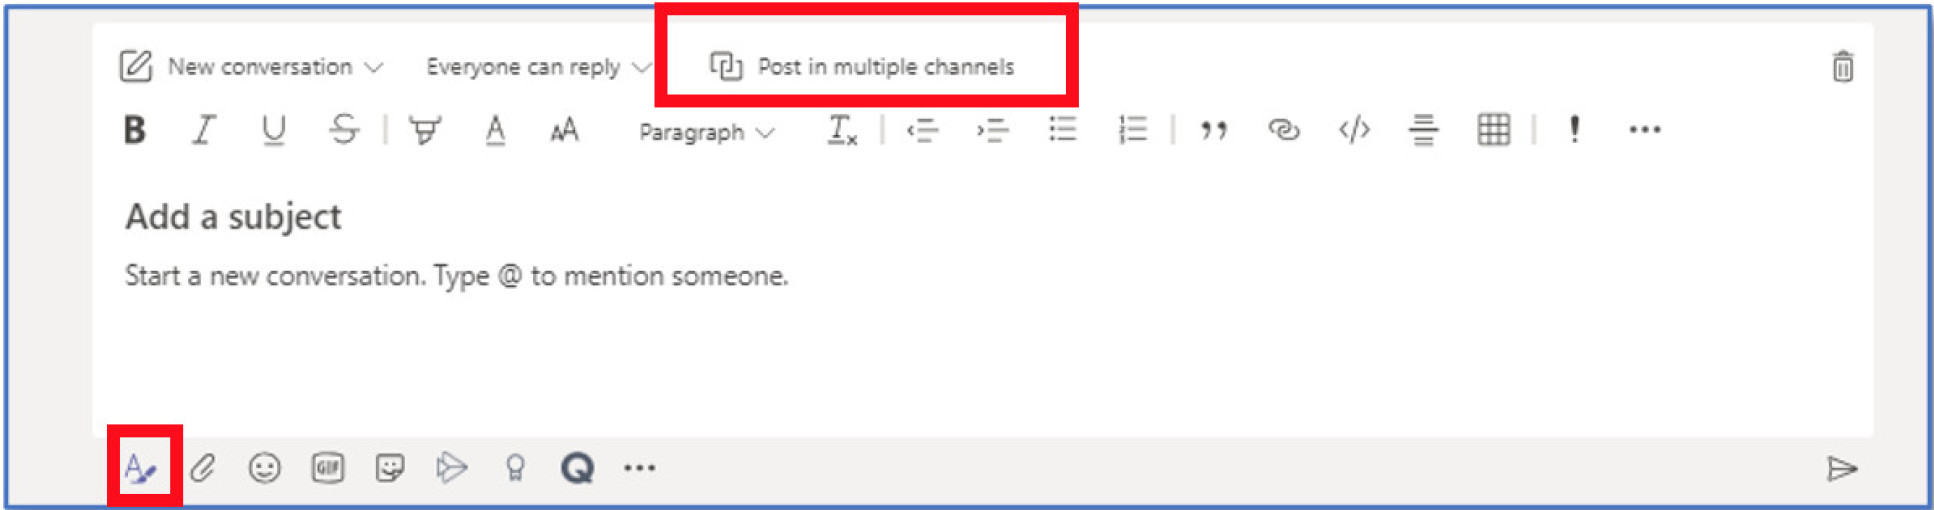
1. In the General channel click on New Conversation in the Posts tab and then click on the A-Paintbrush icon (Format) at the bottom left of the text entry field.
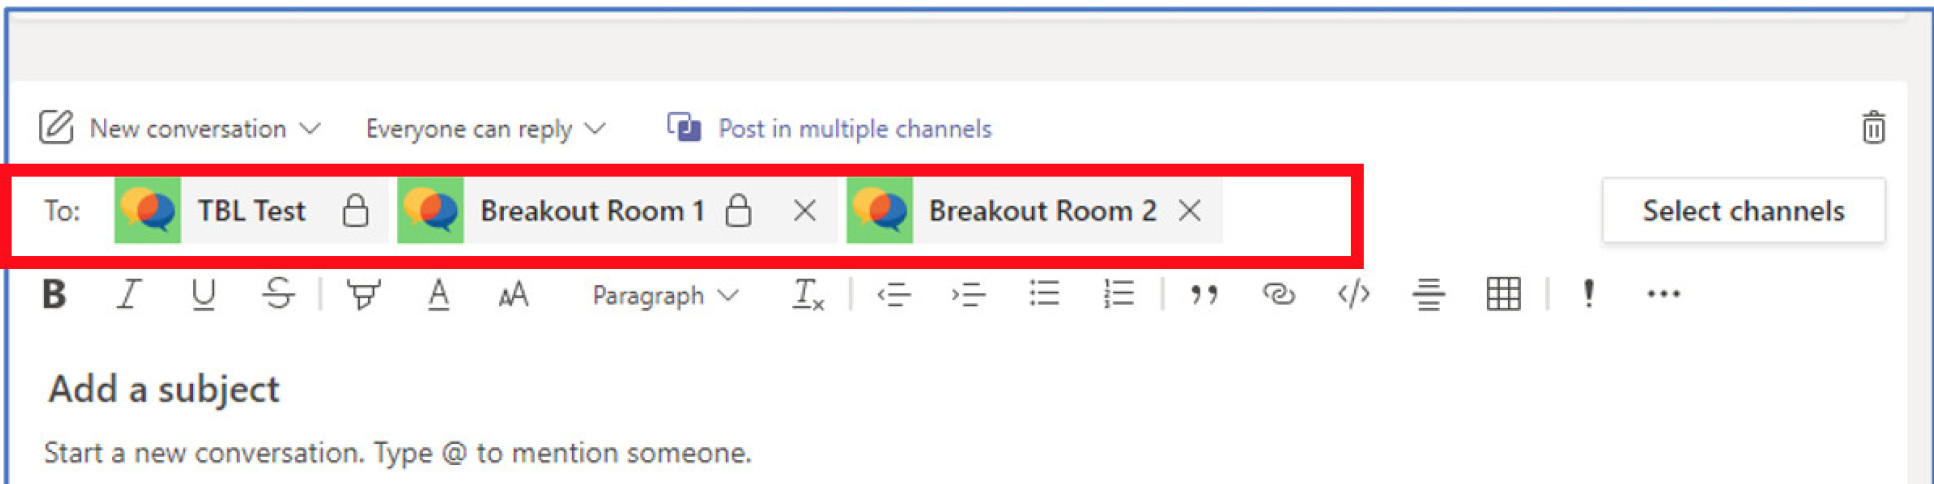
2. Click on the option to Post in multiple Channels and select the required breakout channels to post to.
3. Your selected channels will appear in the To section.
4. Finish writing your message and then click on the send icon.
Please note that for meetings where everyone in the team is present, a good way to ensure people are notified is to @mention the entire team.