The activity presented here should provide you with an understanding of the process of osmosis, give you a visual representation of how it works in a fun series of experiments that can easily be carried out at home!
By carrying out this activity you will not only understand the theory behind osmosis, but start to think like a scientist about how experiments are designed and how we interpret our results.
What is osmosis?
Osmosis is the diffusion of water molecules through a partially permeable membrane, where water diffuses from an area with a high-water molecule concentration, to an area with a lower concentration.
When a membrane is semi-permeable or partially permeable it means water and certain substances in solution can pass through it but many other molecules cannot. An example is the cell membrane that makes up the outside of animal cells.
When you have a dilute solution, the concentration of water molecules will be high, while a concentrated solution will have a low water molecule concentration.
Some people define osmosis as the diffusion of water molecules from an area of low salt concentration to an area of high salt concentration. As a solution with a low salt concentration is one that has a high-water concentration, and vice versa.
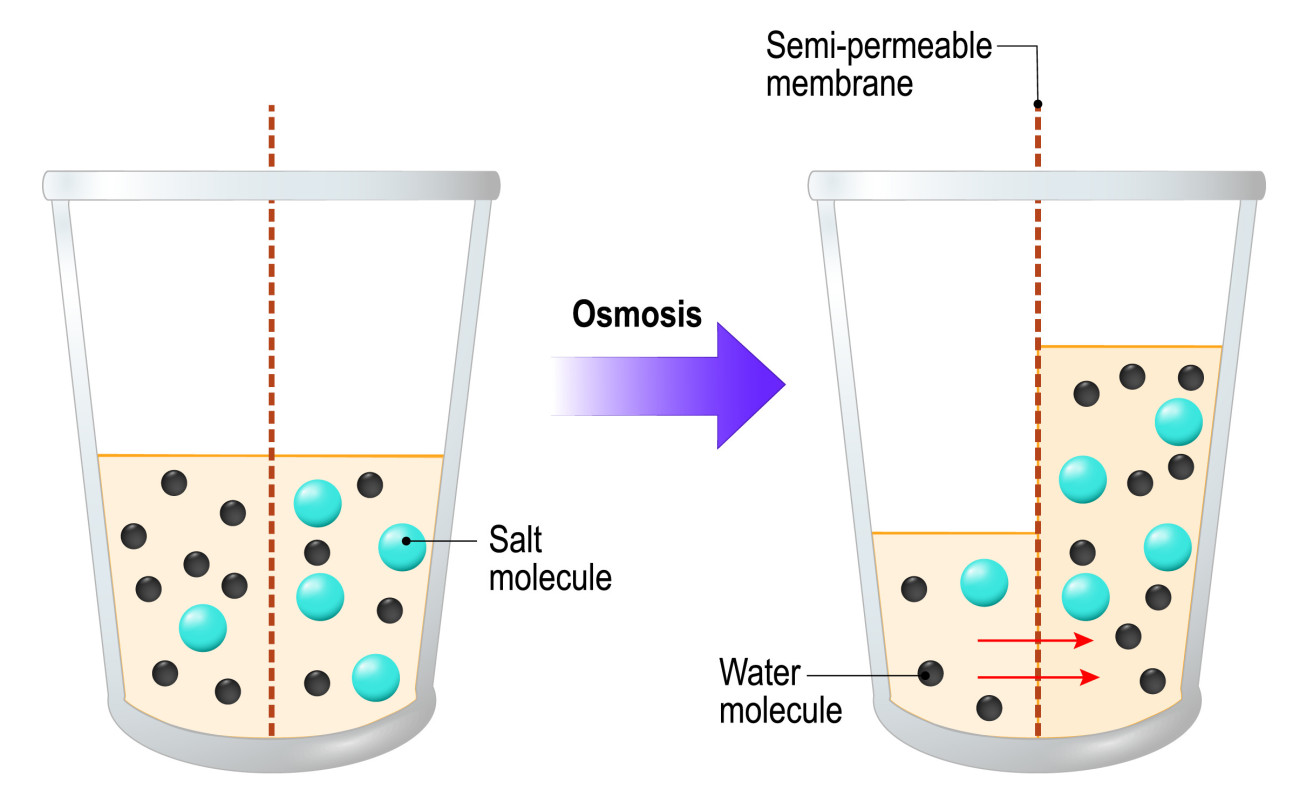
Figure 1: Osmosis. Water molecules diffuse through a semi permeable membrane from a solution with a high water concentration to a solution with a low water concentration.
Eggsmosis!
In this experiment, we will use an egg to demonstrate how water diffuses through a semi permeable membrane. The outside of the egg will be a semi-permeable membrane once we remove the calcium carbonate shell with vinegar. By changing the water concentration of the solution around the egg, we can see how water flows in and out of the egg!
This experiment will take a few days to complete entirely. If necessary, you can refrigerate the eggs for a few days after the vinegar treatment to continue the experiment later.
Materials
- Water
- Vinegar
- Golden syrup or simple sugar syrup
- 3 glasses/containers
- Food colouring
- 1+ Eggs (backup eggs are never a bad idea)
Tip: it might be fun to have an egg from each stage of the experiment to compare – in which case use at least 4 eggs. In case any eggs break it is probably a good idea to try this experiment with a few eggs at a time!
Method
Before starting the experiment, it is good practice to think about what data or information you are going to collect along the way. What kind of measurements might you want to take? For example, you could try weighing the egg at each stage, or using a string or tape measure to measure the circumference. Tip: Take a picture at each stage for comparison, or leave eggs after each stage that don’t progress so you can see each stage side by side!
- Place your egg in a container/cup filled with vinegar. If possible, use a tall clear glass to observe the egg! Then leave the egg for 24 or 48 hours (don’t put a lid on it as it might pop off). For best results leave for 48 hours and change out the vinegar after 24 hours. Bubbles should start to form on the surface of the shell and may cause the egg to rise and fall. This is because the acetic acid in the vinegar is breaking down the calcium carbonate (chemical formula CaCO3) in the egg’s shell. The bubbles that form on the shell are carbon dioxide which has been released from the carbonate (chemical formula CO2)
- The egg should now look very different as the shell has dissolved. Gently rinse the eggs in water to remove traces of the shell that remain (be careful when handling the egg as it could still break!)
- Take the egg out and compare its size to a normal egg - what do you notice? What else has changed and why might that have happened? Make notes! Tip – try gently bouncing the egg on the table! For a more durable bouncy egg you would want to use a hardboiled egg.
- Place the egg into a cup/glass of golden syrup (or simple sugar syrup - with adult supervision heat equal parts water and sugar until sugar dissolves, let cool before using and store extra in the refrigerator) and make sure the egg is submerged, you might have to push it down. Leave the egg for another day.
- Carefully remove the egg from the syrup. Has anything changed in the egg or solution? Take notes and try and think about what has happened and try to explain it using osmosis. Remember handle with care!
- Add some food colouring to a glass of water and gently place your egg inside. Leave for another day. The food colouring adds a fun element but is not necessary.
- Remove the egg and take notes on how it has changed!
Scientists make and record observations during their experiments, so you should make some notes about what you have done and seen. Can you explain what has happened to the egg at each step (vinegar, syrup, water)? Try and make notes of what you noticed, what you measured and any conclusions that you have come to.
Can you explain your observations scientifically?
1. After the vinegar step
a. I noticed:
b. I measured:
c. I concluded:
2. After the golden/sugar syrup step
a. I noticed:
b. I measured:
c. I concluded:
3. After the water step
a. I noticed:
b. I measured:
c. I concluded:
Explanation
The acetic acid in the vinegar has broken down the calcium carbonate shell, leaving the egg with a semi-permeable membrane. This makes it a good model of what our cells are like. Our cells also have semi permeable membranes, meaning water and or other solvents can pass through. The egg has also taken some of the vinegar up through its now semi-permeable membrane and as a result, the egg should now weigh a little more and look larger than it did with its shell.
When you put the shell-less egg in syrup – the syrup has a very high sugar concentration, and a very low water concentration. The egg contains water and vinegar and therefore has a much higher water concentration that the syrup around it. The water therefore flows through the egg’s semi permeable membrane into the syrup, ‘shrinking’ or ‘deflating’ the egg. You may have noticed a layer of this water/vinegar sitting on top of the syrup, this has all come from the egg. If you weighed the egg, you will have noticed that it has lost the weight of that water.
When the deflated egg was then put into water, inside the egg there was a low water concentration while the water outside had a high one. Water therefore flowed back into the egg until the concentration was the same inside the egg as it is outside in the water. The egg should again have been similar in size to the egg before you removed the shell.
Osmosis and Disease
If you have listened to the talk on Gene Therapy you will have learnt about how important it is to control our salt concentrations properly. When the cystic fibrosis transmembrane conductance regulator (CFTR) is missing from our lung cells due to genetic mutations, or not working correctly, calcium ions build up in the cell. This is because CFTR is a calcium channel that pumps chloride ions out of the cell as they cannot cross the semi-permeable cell membrane without it. As a result, a high salt and low water concentration is created inside the cell. This means that through osmosis, water then flows inside from outside the cell. Because the water is now missing from the cell surface, the outside of the cells where gas exchange happens becomes very dehydrated. The mucus that sits atop of our lung cells keeps losing water and becomes very thick and sticky. It builds up and makes breathing uncomfortable and the perfect place for bacteria to multiply and cause infections that are very hard for our bodies immune systems to fight. To hear more and learn all the new and exciting treatments we are researching for patients like those with cystic fibrosis, check out more of our stem in action talks!
Outreach Newsletter
Sign up to our newsletter and mailing list for updates about Outreach events and activities.