
Set up your passkey today
Passkeys
To confirm your identity when logging in to your Imperial account we strongly recommend the use of passkeys.
Why passkeys are the next stage of your digital evolution
Passkeys are phishing resistant, which means:
- You can’t be tricked into typing your details into a fake site
- If the website’s domain doesn’t match, login simply won’t work
- Your credentials can’t be intercepted, copied, or replayed
All about passkeys
What are passkeys?
A passkey is a fast, secure, password-free login method, where your device generates a private key stored locally on your device. It works with MFA by replacing passwords and traditional codes with biometric authentication (fingerprint/facial recognition) or a PIN, serving as a phishing-resistant, single-step verification.
How passkeys work
Think of your account as a house with a unique lock. A passkey is a special key your device keeps for each “house.”
Instead of remembering a password, your device uses this key to open the lock securely, only when you approve (with Face ID, Touch ID, a PIN, or a hardware key).
Why passkeys are better than just passwords?
- No memorization: You don’t type anything -your device handles the key!
- Fast and convenient: Face ID/Touch ID or a quick PIN unlock is enough.
- Phishing-resistant: Even if you click a fake site, your real key won’t work there because the “lock” doesn’t match.
- Your credentials are safe - they can’t be intercepted, copied, or replayed
How to set up passkeys
- 1. Get the Microsoft Authenticator app
- 2. Set up your Passkey
- 3. Using your passkey with the Authenticator app
- 4. Need something even more secure? Get a physical security key
- On your phone, visit the App Store (iPhone) or Play Store (Android) to download and install the Microsoft Authenticator app. Ensure that you allow it to use your camera and send notifications when it prompts you.
- On your computer, go to https://mysignins.microsoft.com/security-info
- Click Add method.
- On the Add a method window, ensure Authenticator app is selected from the list, and click Add.
- On the Start by getting the app window, click Next.
- On the Set up your account window, click Next.
- On your phone, open the Authenticator app. If you’re asked for an unlock code, that’s your phone’s PIN (it may alternatively require your fingerprint or retina scan if you’ve set up either of those methods on your phone).
- Click the menu button (three dots) and then Add account.
- Click Work or school account.
- Click Scan a QR code. If the app asks for permission to use your camera, click Allow.
- The app should then open a QR code scanner. Point your camera at the QR code on your computer screen.
- Click Next on the computer.
- Click Enable phone sign-in or Approve on your phone. You may also need to unlock the app using your phone’s PIN, your fingerprint or retina scan.
- Click Next on your computer.
- Click Set default sign-in method, or Change if there’s already one set.
- Select Microsoft Authenticator – passkeys from the list, and click Confirm.
In case you are unable to access your mobile phone for some reason (e.g. your phone has run out of battery or you have lost your phone), make sure you set up a secondary method. Learn how to set up a secondary method from these FAQs.
The Microsoft help web pages also offer in-depth instructions on how to use Microsoft Authenticator with Microsoft
In order to use passkeys on the Microsoft Authenticator App, your device will need to be running at least Android 14 or iOS 17. You will also need to have the latest version of the Authenticator app installed. (If you are having any issues please see the MFA and Passkeys FAQs.)
Setting up Microsoft Authenticator with a Passkey
- On your phone, open the Microsoft Authenticator app. (If you’re asked for an 'unlock code', that’s either your phone's PIN, your fingerprint or face ID, depending on how you normally unlock your phone.)
-
Select your account from the list, OR;
-
Select the + icon in the top right
-
Then, select add a work or school account
-
Select sign in.
-
When prompted add your @ic.ac.uk account and verify using the MFA method you nomrally use (e.g. one time code, SMS text, call etc.
-
3. Select Create a Passkey.

4. Select Sign In, you will be prompted to confirm your identity with either your phone's PIN, your fingerprint or face ID.

5. Select Done, your Passkey has now been created and can be used to verify your Imperial account as part of your sign in process going forwards.
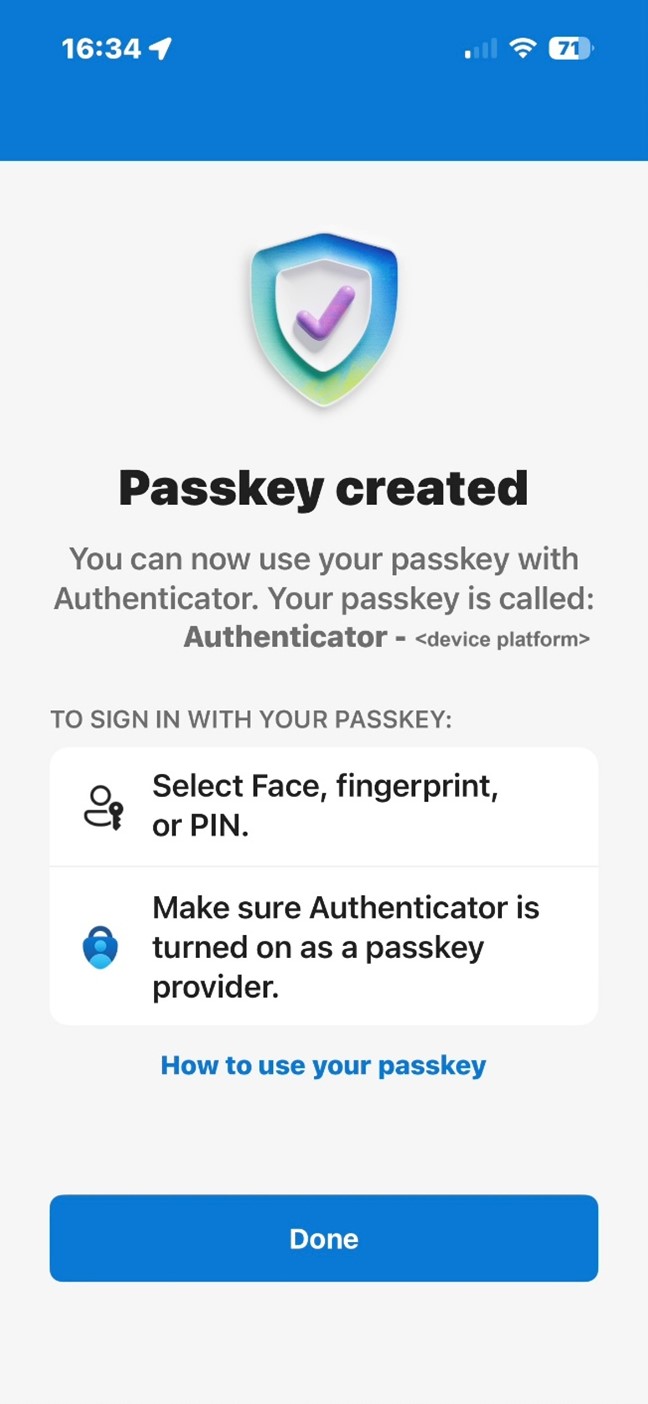
NB. If prompted at this stage to enable Microsoft Authenticator in your device's password manager, please follow the on screen instructions to enable this setting.
Authenticating with a passkey
If this is your first time using a passkey to authenticate, your account will default to your existing authentication method e.g. Authenticator App with Number Matching. If this happens, please follow the instructions below.
If you have done it before, please simply select continue/approve to complete the authentication request.
When you log in, you will be prompted to do so using your passkey. Select continue/approve.
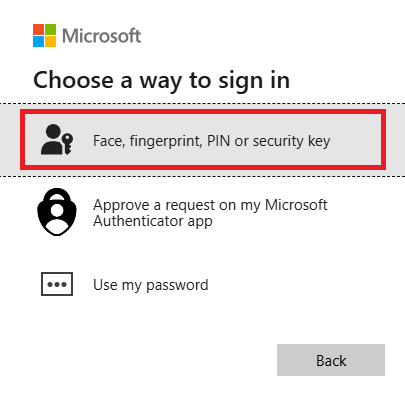
- Select other ways to sign in.
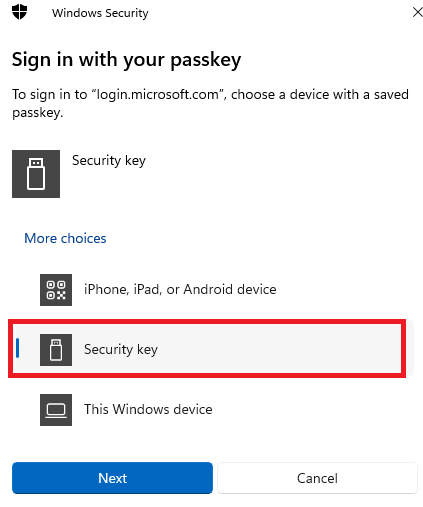
- Select Face, fingerprint, PIN or security key or Use another device.
- Select iPhone, iPad or Android Device and click Next.
- You will be presented with a QR code.
- Open the Authenticator App and click on the QR code icon.
6. Scan the QR code.
7. Select Continue twice.
Sometimes a digital passkey isn't secure enough! For example, some staff that are Admins accessing high risk systems or for those using shared or public devices will require a physical hardware key, also known as a Fido2 device.
NB: You will need to already have this physical security key in order to set this up. Please complete this form if you require a Fido2 security key.
Setting up the Authenticator app with a security key
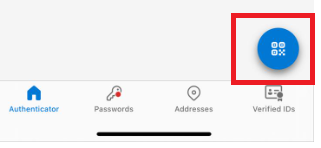
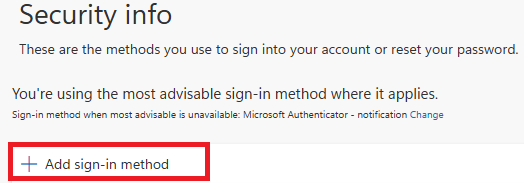
- On your device, go to your MySign-Ins Microsoft account page.
- Click + Add sign-in method.
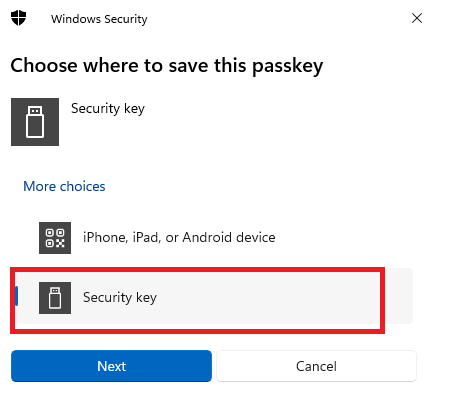
3. Select Security Key.
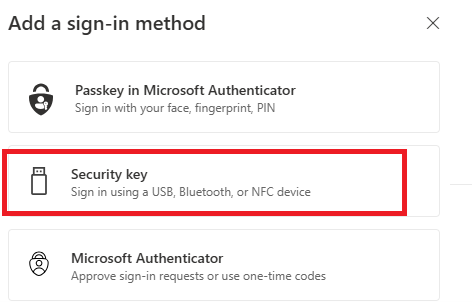
4. Select how you wish to setup the token via USB or NFC. Typically, either method works on a smartphone, but you would use USB on a computer.
5. Select next.
6. Select Security key and click Next.
7. Your browser will then ask permission to access your token – click Ok.
8. Your browser will then confirm that it will allow Microsoft to see the make and model of your security key, click Ok.
9. Touch your security key.
10. If you have a new device, you will be prompted to set up a pin on your key. If you already have a pin, please enter this now.
11. Touch your security key twice.
12. You will receive confirmation that your passkey has been saved.
13. You will then be prompted to name your key. Please choose a distinguishable name as should you lose your key, you will be able to easily remove it from your account.
14. Click done.
Authenticating with a security key
If this is your first time using a security key to authenticate, your account will default to your existing authentication method e.g. Authenticator App with Number Matching. If this happens, please follow the instructions below.
If you have done it before, please simply select the pin when you set up your security key and touch it to complete the authentication request.
- Select other ways to sign in.
- Select Face, fingerprint, PIN or security key.
3. Select Security key and click Next.
Once this is completed, you can authenticate with your security key as normal, by entering the pin associated with your key and touching it to complete the authentication request.
If you cannot set up a passkey, please use the number matching method below, or contact the ICT Service Desk for help setting up your passkey.
Using MFA with number matching (No passkeys)
Setting up authenticate using number matching
- On your phone, visit the App Store (iPhone) or Play Store (Android) to download and install the Microsoft Authenticator app. Ensure that you allow it to use your camera and send notifications when it prompts you.
- On your device, go to your MySign-Ins Microsoft account page.
- Click Add method.
- On the Add a method window, ensure Authenticator app is selected from the list, and click Add.
- On the Start by getting the app window, click Next.
- On the Set up your account window, click Next.
- On your phone, open the Authenticator app. If you’re asked for an unlock code, that’s your phone’s PIN (it may alternatively require your fingerprint or retina scan if you’ve set up either of those methods on your phone).
- Click the menu button (three dots) and then Add account.
- Click Work or school account.
- Click Scan a QR code. If the app asks for permission to use your camera, click Allow.
- The app should then open a QR code scanner. Point your camera at the QR code on your computer screen.
- Click Next on the computer.
- Click Enable phone sign-in or Approve on your phone. You may also need to unlock the app using your phone’s PIN, your fingerprint or retina scan.
- Click Next on your computer.
- Click Set default sign-in method, or Change if there’s already one set.
- On your device, go to your MySign-Ins Microsoft account page.
- Check Microsoft Authenticator is selected. If not, Click + Add sign-in method and select Microsoft Authenticator and click Add.
Authenticating using number matching
On your phone, open the Authenticator app. If you’re asked for an unlock code, that’s either your phone's PIN, your fingerprint or face ID, depending on how you normally unlock your phone.
A number will display where you are trying to access services behind a login screen. You will need to enter that number on your app as shown in the pictures below.

Be secure - best practice
You should use passkeys and MFA alongside other best practices for cybersecurity:
- Set strong passwords
- Keep up to date with latest Be Secure guidance
- Watch 'We're all in this together' videos
Further support
If you need more support setting up passkeys, the Microsoft Autheticator app, or any form of Multi-Factor Authetication please contact the ICT Service Desk.