Encrypting data makes the information unreadable, it can only be read using a secret key to unlock it, called decryption. Data encryption can be applied to both stored data (on computer drives or removable media) and data shared via networks.
Mobile devices and removable media, including laptops, USBs, hard drives and DVDs pose particular risks and encryption can be used to reduce these risks when sharing or storing sensitive information using these methods.
If you are dealing with sensitive or personal information, you may need to encrypt it. If you are not sure, check with the ICT Security team via the ICT Service Desk.
There are a number of supported options available for encrypting your data on different media.
Encryption colour blocks
Options for encrypting sensitive information
- Encrypting data on central file space/group space/H:drives
- Encrypt your mobile device
- Encrypting email
- Encrypting laptops
- Encrypting desktops
- Encrypting removable media
- Encryption options using Windows
- Encryption options using a Mac
- Encryption options using Linux
Research groups and members of staff working with sensitive data can encrypt their data using Symantec File Share Encryption.
Note
This service is only available for Windows users.
Encrypting data makes the information unreadable unless the viewer uses a secret key to unlock it, called decryption. Data encryption can be applied to both stored data, on computer drives or USB storage devices) and data being transferred via networks. If you store data, emails or photos on your portable device then you should encrypt the information to protect it. If the device is also protected with a PIN or password, encryption will further reduce the risk of your data being subject to unauthorised access. Check the manufacturer's instructions for more information to encrypt your mobile device.
Visit the encrypt emails page on the Microsoft website and follow the instructions under the Microsoft 365 Message Encryption section.
If you think you have a specific use for S/MIME encryption, please contact the ICT Service Desk.
Windows machines
All laptops purchased with College funds must be encrypted to safeguard data. For laptops to be encrypted they must be business-level models and include a Trusted Platform Module (TPM) chip.
All laptops available for purchase from the preferred Imperial supplier, Hewlett Packard (HP), meet requirements for encryption and can be encrypted by ICT. Visit the buy computers web page for details on how to buy a computer.
If you purchase a laptop from another manufacturer, you must ensure that it has a TPM chip, as this is required to encrypt the laptop.
Mac machines
FileVault
We are able to offer College-supported full-disk encryption for Mac laptops using Apple's built in FileVault.
FileVault full-disk encryption in OS X Maverick (10.9) uses the government-approved encryption standard, the Advanced Encryption Standard with 256-bit keys (AES-256). In OS X Mountain Lion and below it uses 128-bit keys (AES-128).
Visit the Apple website for instructions for FileVault
Need help?
If you need assistance, contact the ICT Service Desk.
ICT are in the process of encrypting Windows desktops by default with Microsoft Bitlocker and centrally managed by MBAM (Microsoft Bitlocker Administration and Monitoring).
Visit our Bitkey recovery website and enter your College username and passwod to recover your Bitkey. For more information visit our Bitkey recovery (MBAM) web page.
There are two main methods for encrypting removable media, such as USBs and hard drives:
- Using hardware (devices that encrypt all data automatically).
- Using software (software encrypts files stored on the media).
If you are unsure which solution is most appropriate, contact the ICT Security team via the ICT Service Desk.
Hardware encryption
There are a number of USB storage devices that support hardware encryption. Using this method will ensure that all data stored on the media is encrypted. It can be more expensive that the software options and some hardware needs drivers to be installed on the computer before the hardware can be used.
Kingston DataTraveller are compatible with Windows and OS X machines and are available via our preferred supplier, BT Business Direct.
Software encryption
Software encryption solutions tend to be cheaper than hardware but may require you to store the data in a certain way, to ensure that it is encrypted. If data is stored in the wrong place, the data would not be encrypted as expected. The onus is on you to make sure that your data is correctly saved in an encrypted area.
See encrypting files on Windows or Mac and Linux machines, below.
There are two options for encryption when using a Windows machine - WRM and 7-zip.
Windows Rights Management
The ICT Security team provides support for Windows Rights Management (WRM). WRM provides encryption and control of document distribution to users of Microsoft Office (including Outlook).
WRM is available when using Microsoft products and allows you to quickly encrypt and share files safely with other members of Imperial College London.
Instructions on using WRM
- Open the document, spreadsheet or email you wish to protect.
- Go to the Office button in the top right hand corner of the document and select Prepare.
- Select one of the options: Encrypt Document, Restrict Permission, Add a Digital Signature.
For advice on how to use WRM with your Outlook, see Encrypting Email, above.
7-Zip
7-Zip should be preinstalled on all College-owned Windows desktop machines and is used to encrypt the contents of a Zip or 7-Zip file. It is available on Linux, OS X and Windows. 7-Zip does rely on a decryption key to encrypt and decrypt files.
Mac OS X offers built in encryption of your Home folder, with the FileVault. In addition you can use WRM and 7-zip for encryption.
Read Apple instructions for FileVault.
You can also create an encrypted disk image to store encrypted files, using the Disk Utility tool.
Windows Rights Management
The ICT Security team provides support for Windows Rights Managment (WRM). WRM provides encryption and control of document distribution to users of Microsoft Office (including Outlook)
WRM is available when using Microsoft products and allows you to quickly encrypt and share files safely with other members of Imperial College London
INSTRUCTIONS ON USING WRM
- Open the document, spreadsheet or email you wish to protect.
- Go to the "Review" tab.
- Select one of the options: Protect or Restrict Permissions.
- For advice on how to use WRM with your Outlook, see Encrypting Email, above.
7-ZIP
7-Zip should be preinstalled on all College-owned Windows desktop machines and is used to encrypt the contents of a Zip or 7-Zip file. It is available on Linux, Mac OS X and Windows. 7-Zip does rely on a decryption key to encrypt and decrypt files.
You can use various tools to encrypt files stored on a computer running the Linux operating system.
VeraCrypt
For volume/disk level encryption, we recommend VeraCrypt.
- Online help for VeraCrypt
- Please ensure that you backup a copy of the password you use to encrypt the volume/disk. If you lose it, you will no longer be able to access your data.
7-ZIP
7-Zip should be preinstalled on all College-owned Windows desktop machines and is used to encrypt the contents of a Zip or 7-Zip file. It is available on Linux, OS X and Windows. 7-Zip does rely on a decryption key to encrypt and decrypt files.
How to protect Microsoft Office documents
The examples below show how to protect Word documents, but the instructions are also applicable to Excel & PowerPoint – the buttons/links should be in the same location.
1. Open your Word document
2. In the top left corner, select "File"

3. Then select "Protect Document"
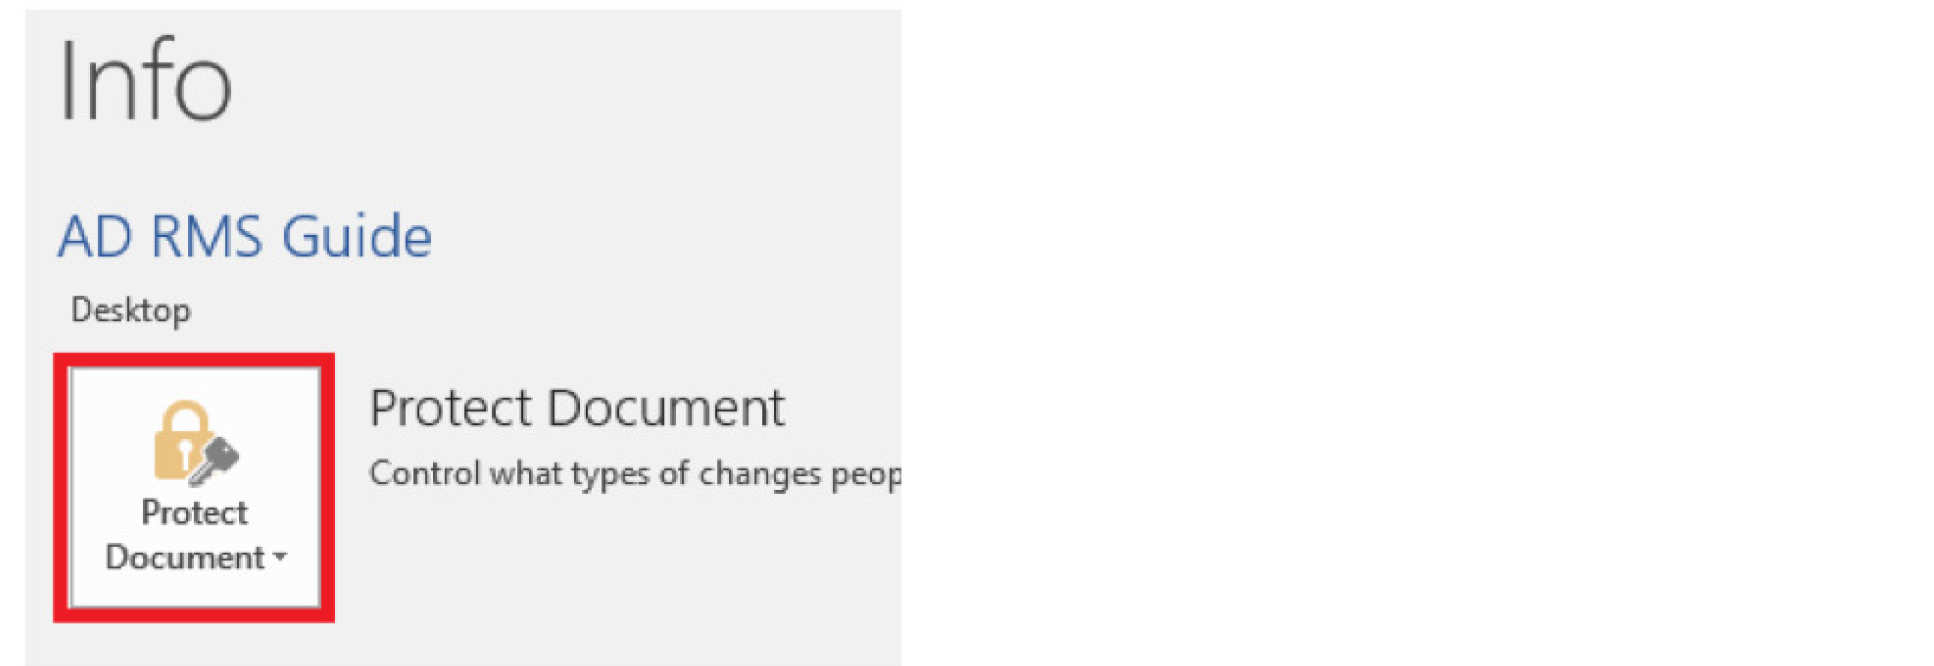
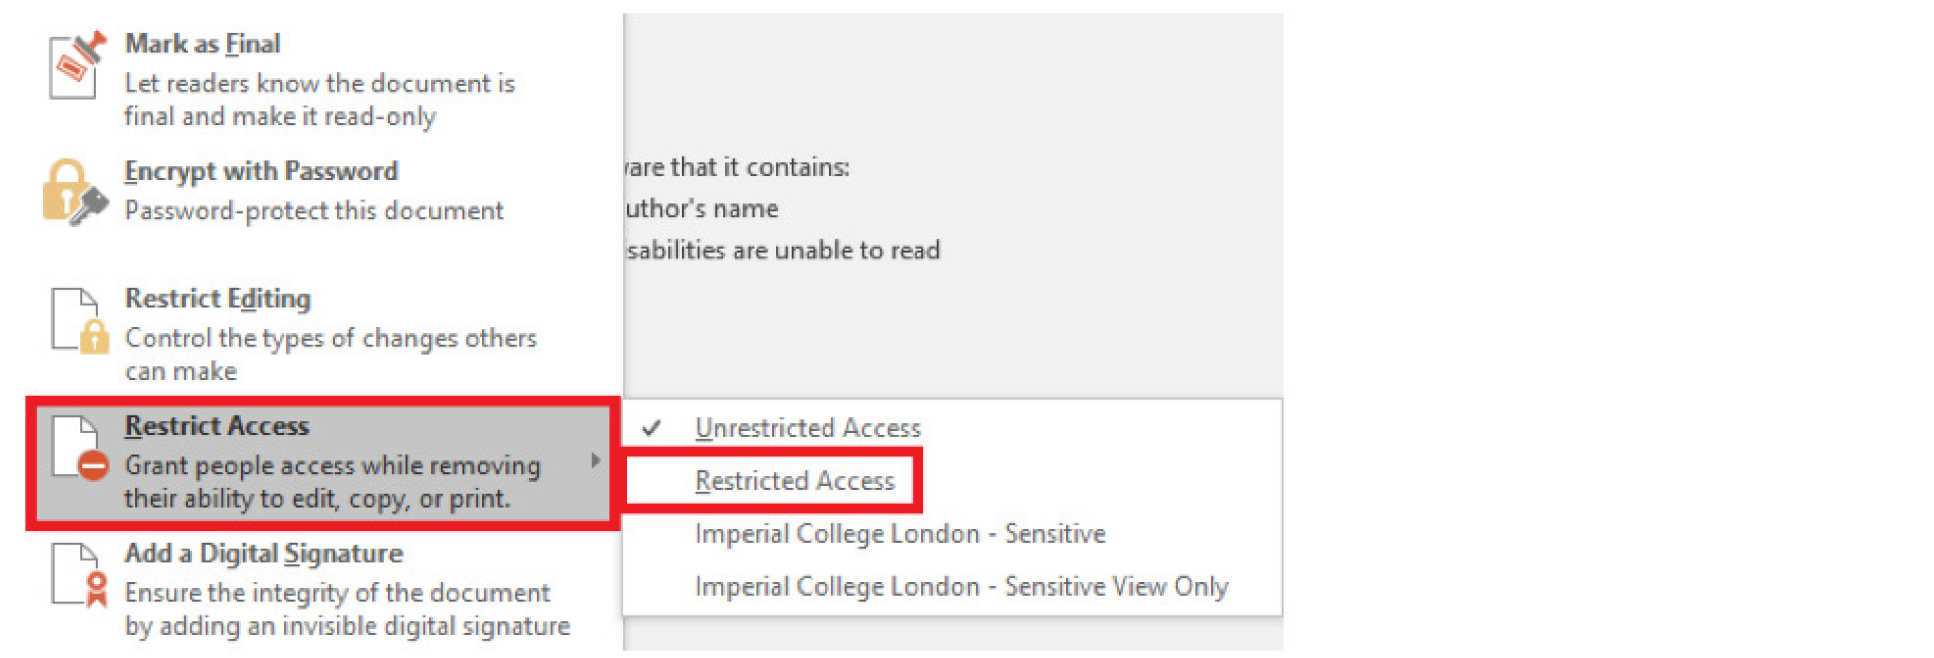
4. On the next menu select " Restrict Access" and then "Restricted Access"
5. In the next window, tick "Restrict permission to this document" and select who you want to be able to read the file you've created/protected.
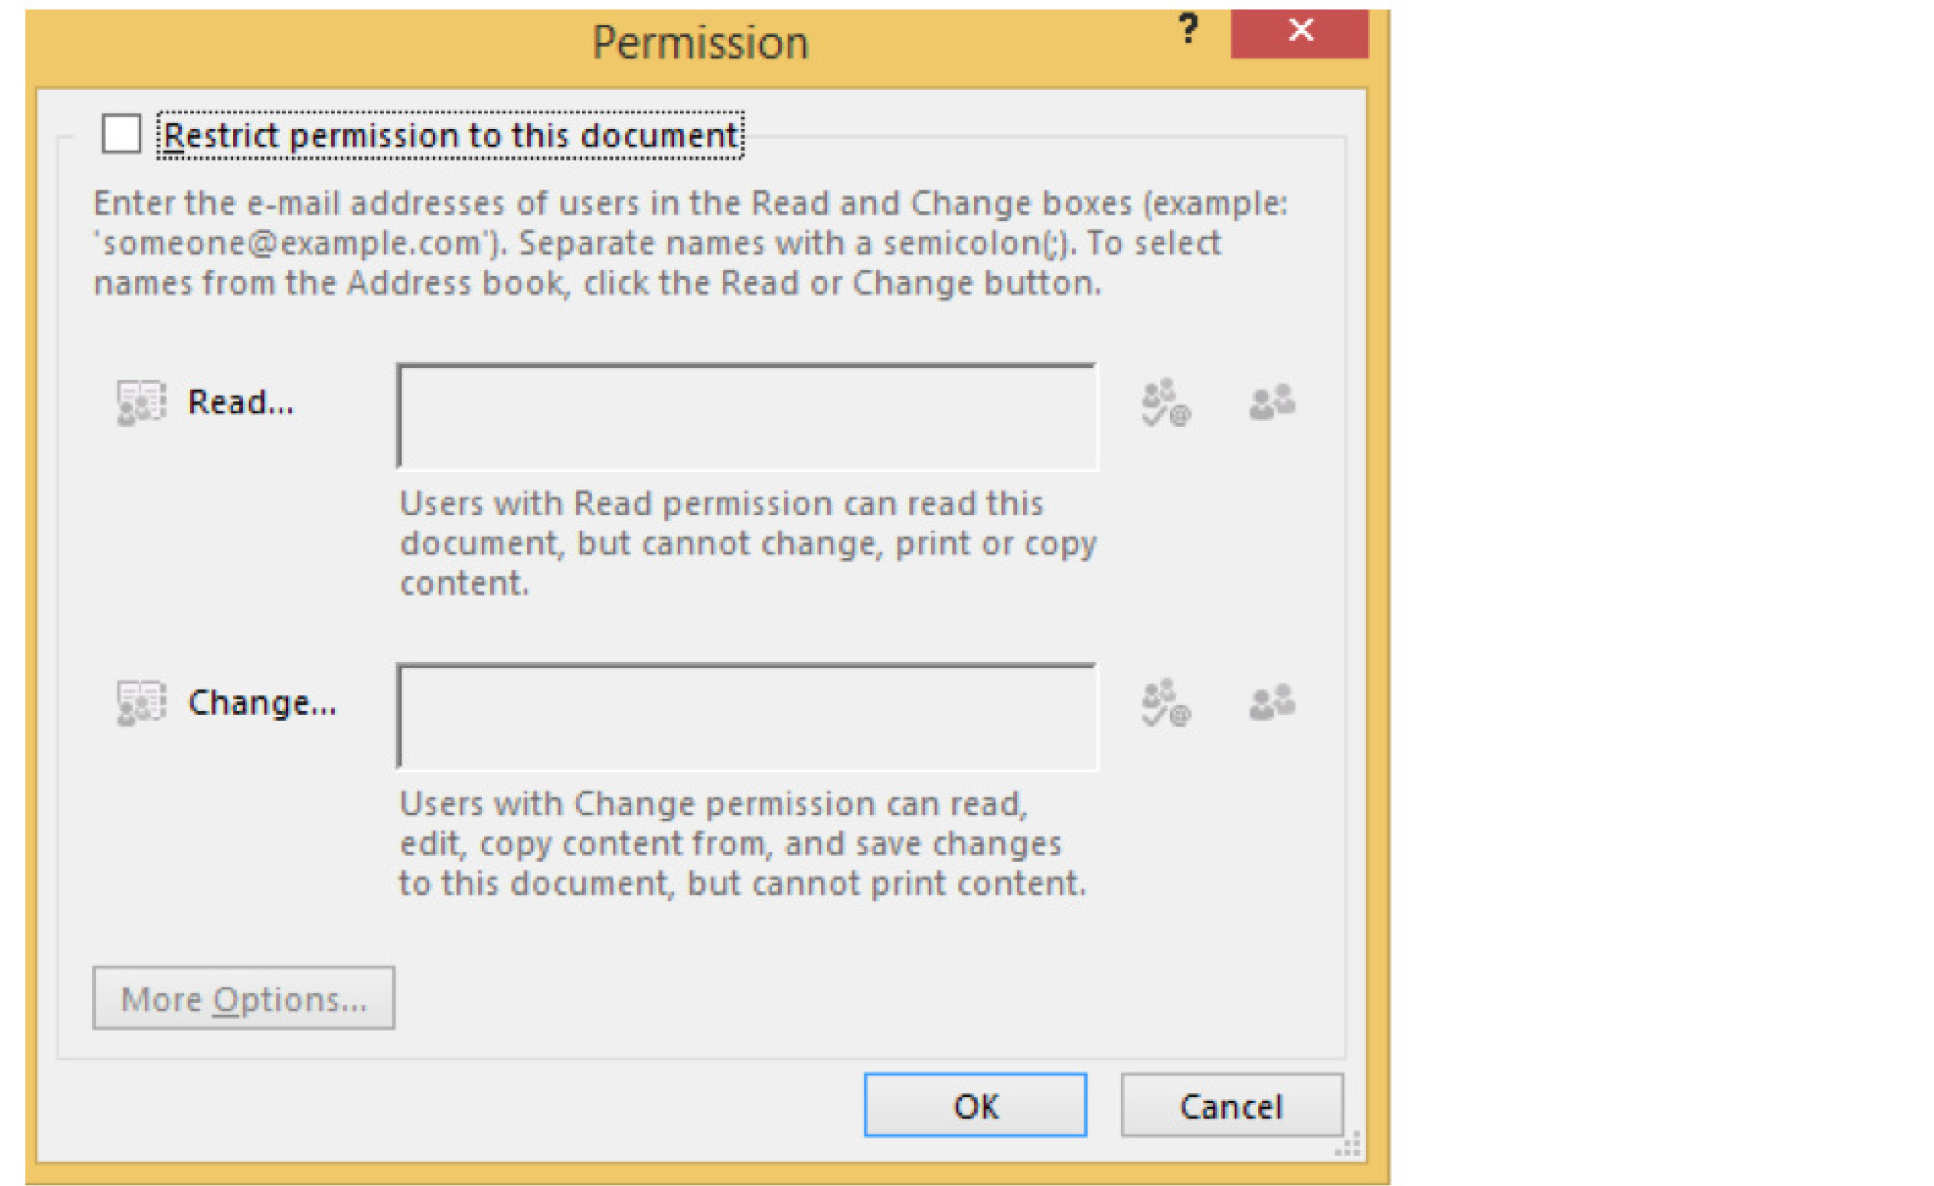
6. Under the "More Options" tab, located at the bottom of the above window, you can select some additional options including:
- Expiry date
- Whether someone can print or not
- Whether someone can copy the content - this will enable them to copy it into another doucment (potentially unprotected)
- An email address to request additional permissions from
- Whether it requires a connection to verify permissions
The examples below show how to protect Word documents, but the instructions are also applicable to Excel and PowerPoint – the buttons/links should be in the same location.
1. Open a "Word document"
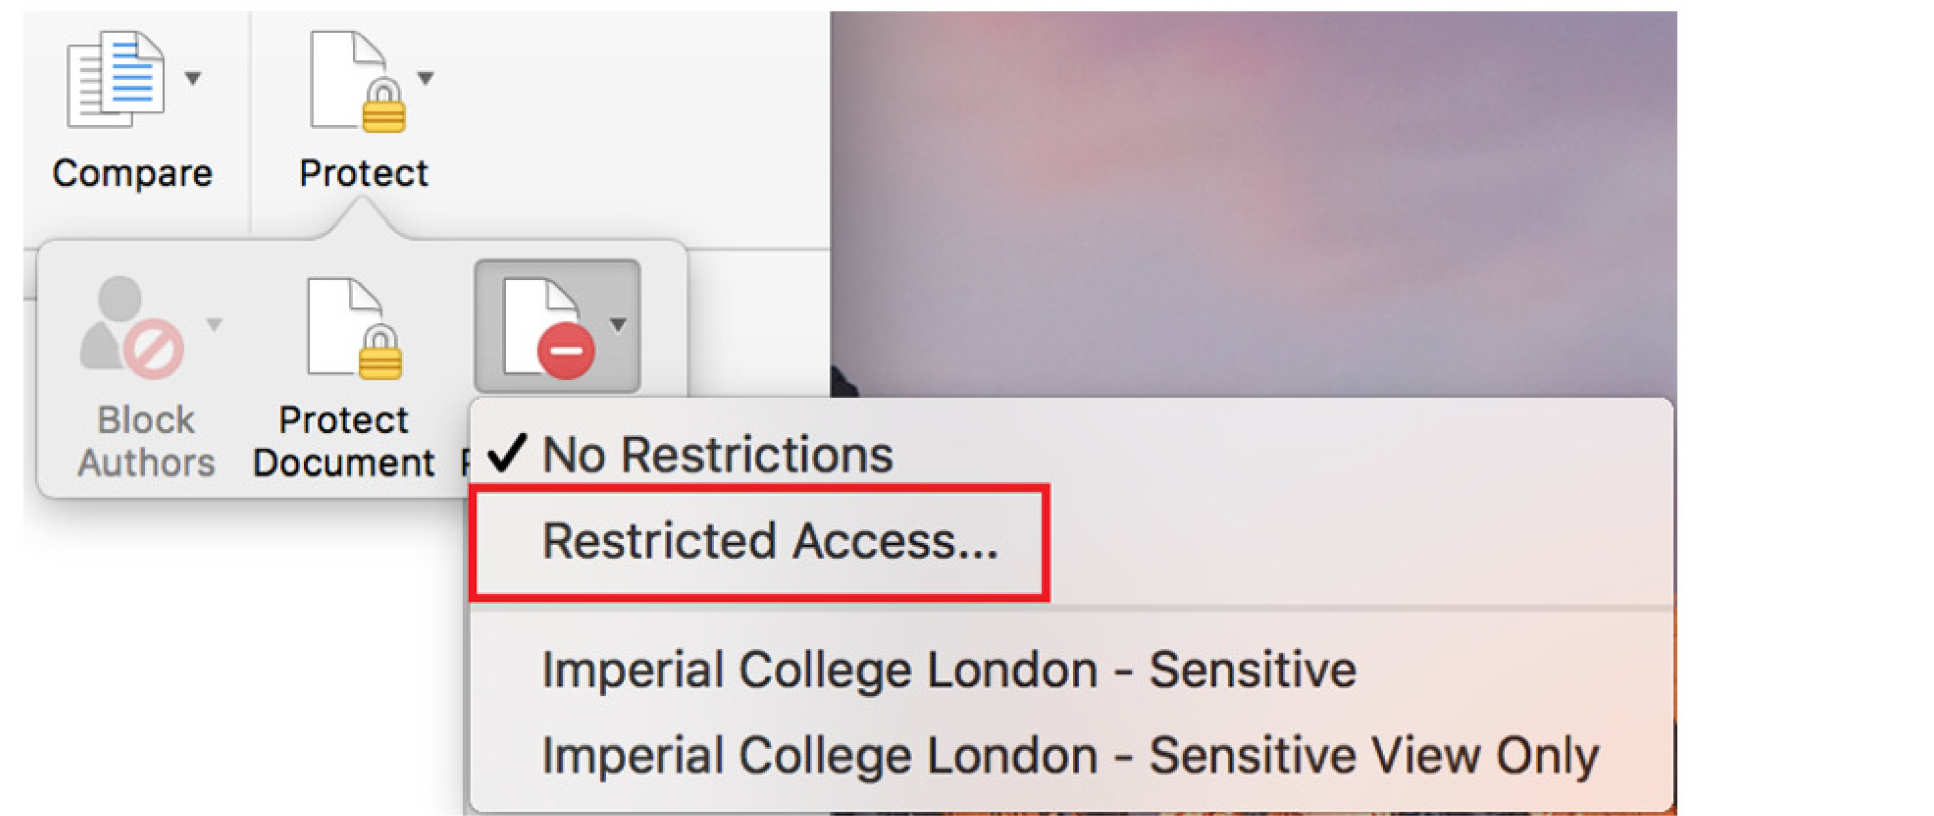
2. Select "Review" from the menu bar

3. Select "Protect"

4. Then select "Restrict Permission" followed by "Restricted Access"
5. A prompt will appear from MacOS requesting access to allow Word/Excel/PowerPoint to access your keychain. Please enter your "Mac login password"
6. Finally, select who should be able to read the file
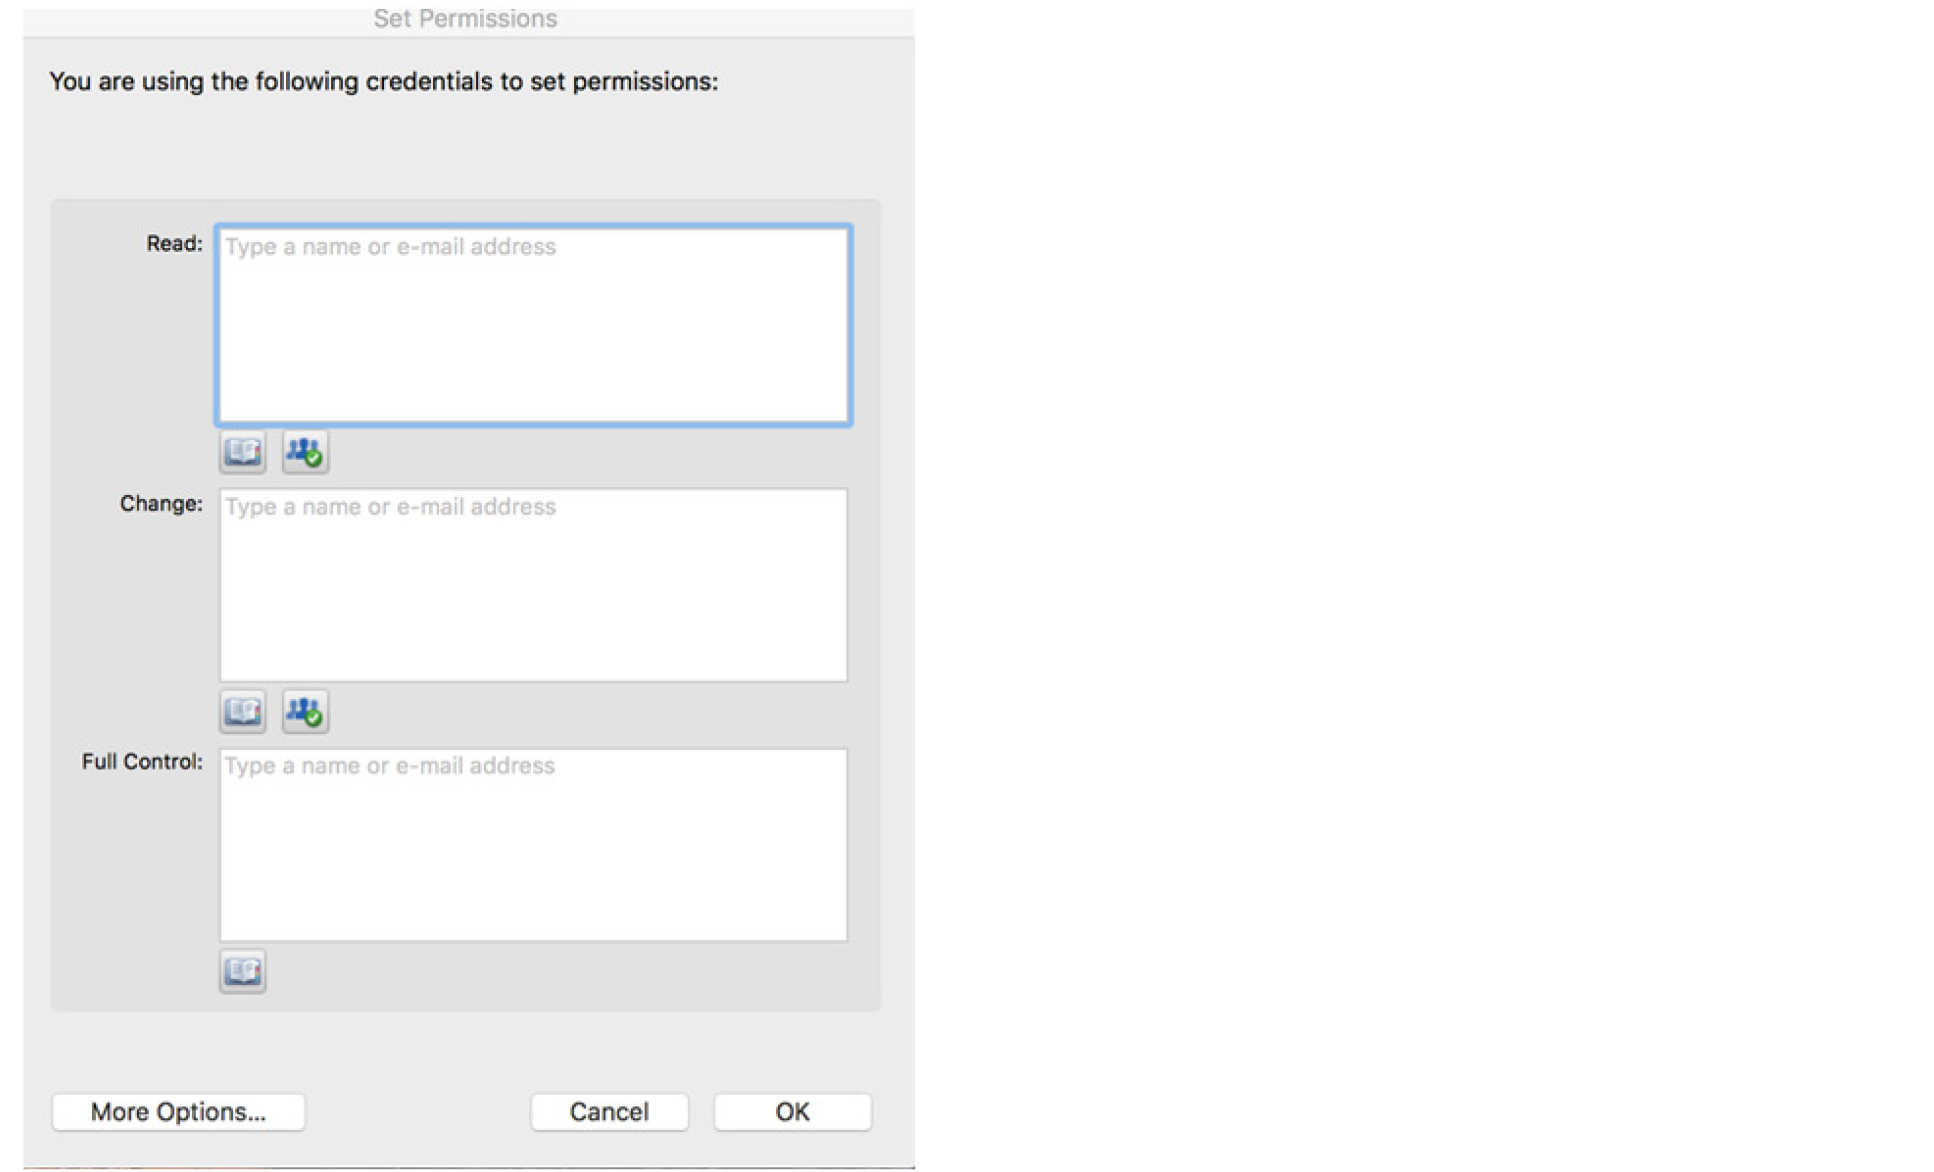
7. Under “More Options” you can select some additional options including:
- Expiry date
- Whether someone can print or not
- Whether someone can copy the content – this will enable them to copy it into another document (potentially unprotected)
- Whether it requires a connection to verify permissions